MIT LASER ASSASSIN
**Table of Contents**
1. [About our Project](#aboutourproject)
2. [Functional Block Diagram](#functionalblockdiagram)
3. [State Machine Diagram](#statemachinediagram)
4. [Design Challenges and Decisions](#designchallengesanddecisions)
5. [Parts List](#partslist)
6. [Code Documentation](#codedocumentation)
7. [Power Management](#powermanagement)
# About our project
Students at MIT all know about the annual assassin game that takes place during IAP. Sure, it’s thrilling to put a sticker on someone’s back, but imagine taking this to the next level... with laser tag. Our project idea revolves around a game concept that has been blowing up in pop culture recently: the “battle royale.” In a battle royale, players are placed onto a map where they fight to be the last man standing. We want to use the power of the ESP32 to bring battle royale to real life. When a game of MIT Laser Assassin begins, most of the school campus acts as the playing field. As the game progresses, however, the playing radius gets smaller and smaller based on the time elapsed so that players are forced to encounter each other. Player locations are constantly checked to make sure their coordinates lie within the shrinking latitude/longitude fence. If you leave the playing radius for 30 seconds, you get knocked out of the game!
Players have to look for opponents on campus, and once they find a target, they click a button on their ESP32 to fire their laser pointer (built in to the hand-held laser assassin device). If the laser hits the sensor rig that their target is wearing, the target is out of the game. The player who knocked the target out is now one step closer to victory, as is indicated by the elimination tally displayed on their device. The target sees their total elimination count along with their ranking in the game. There is also a long-term elimination leaderboard that is viewable on web browsers.

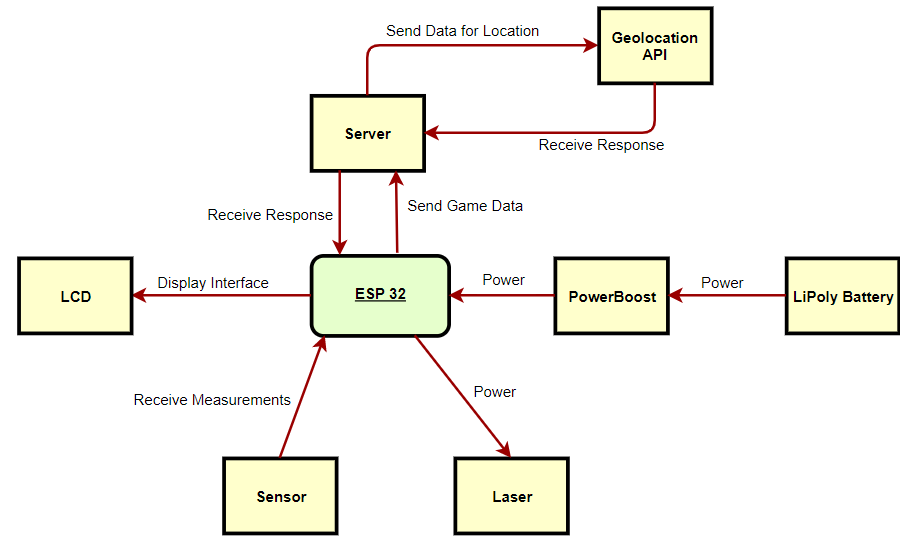
# Functional Block Diagram
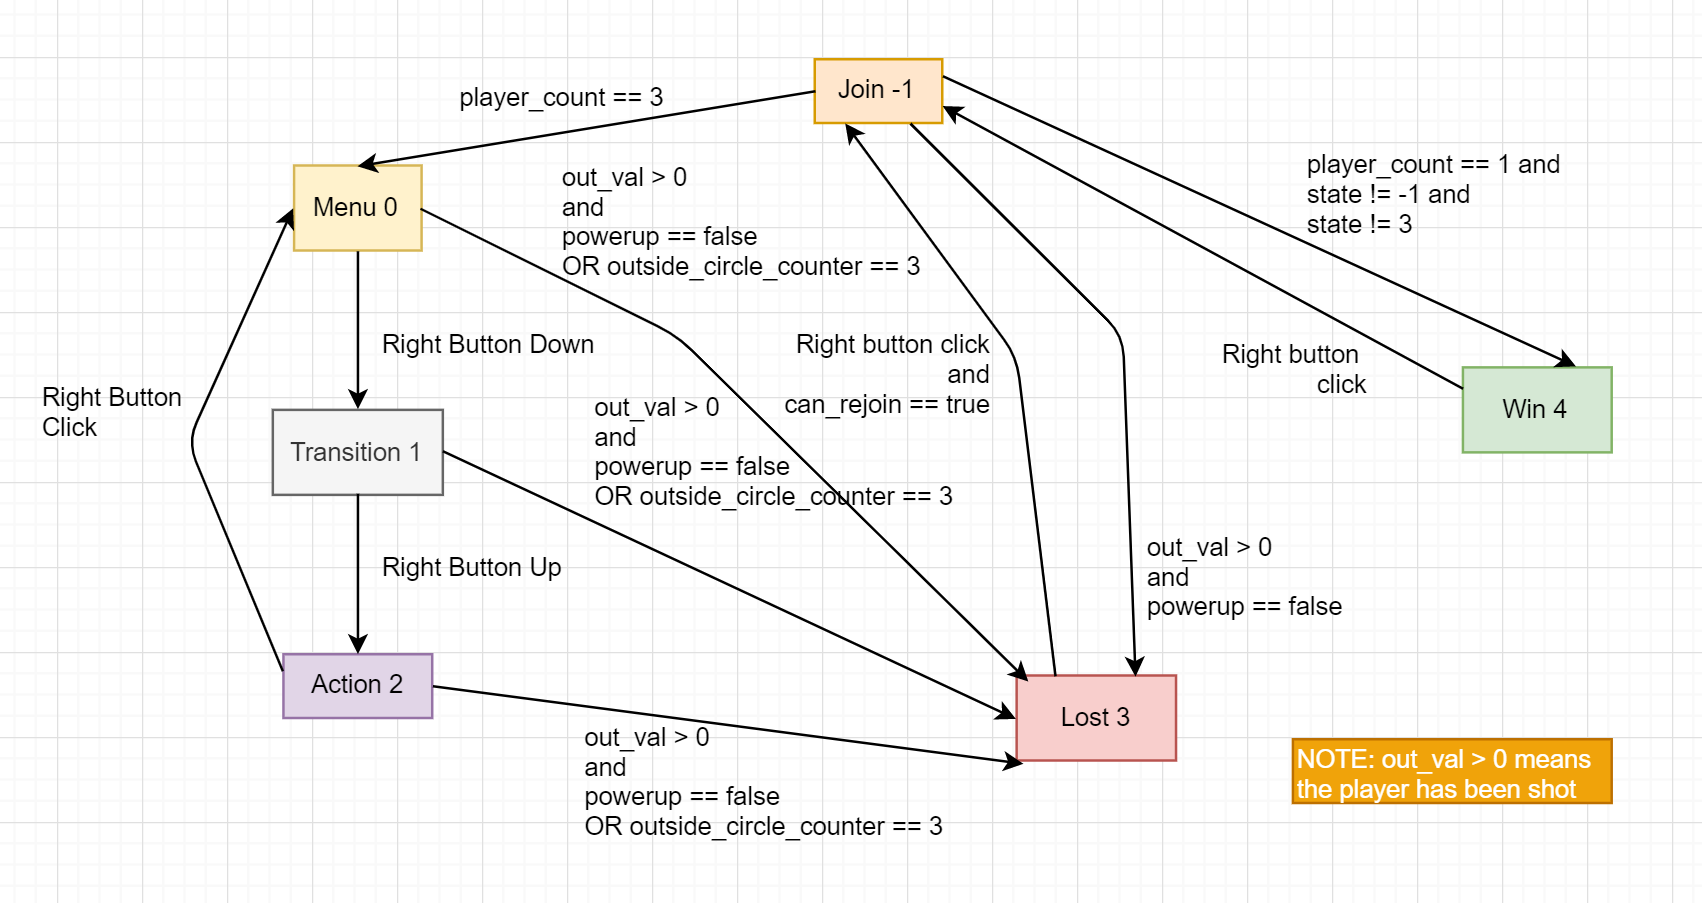
# State Machine Diagram
# Design Challenges and Decisions
## **Hardware**
### Full Wearable
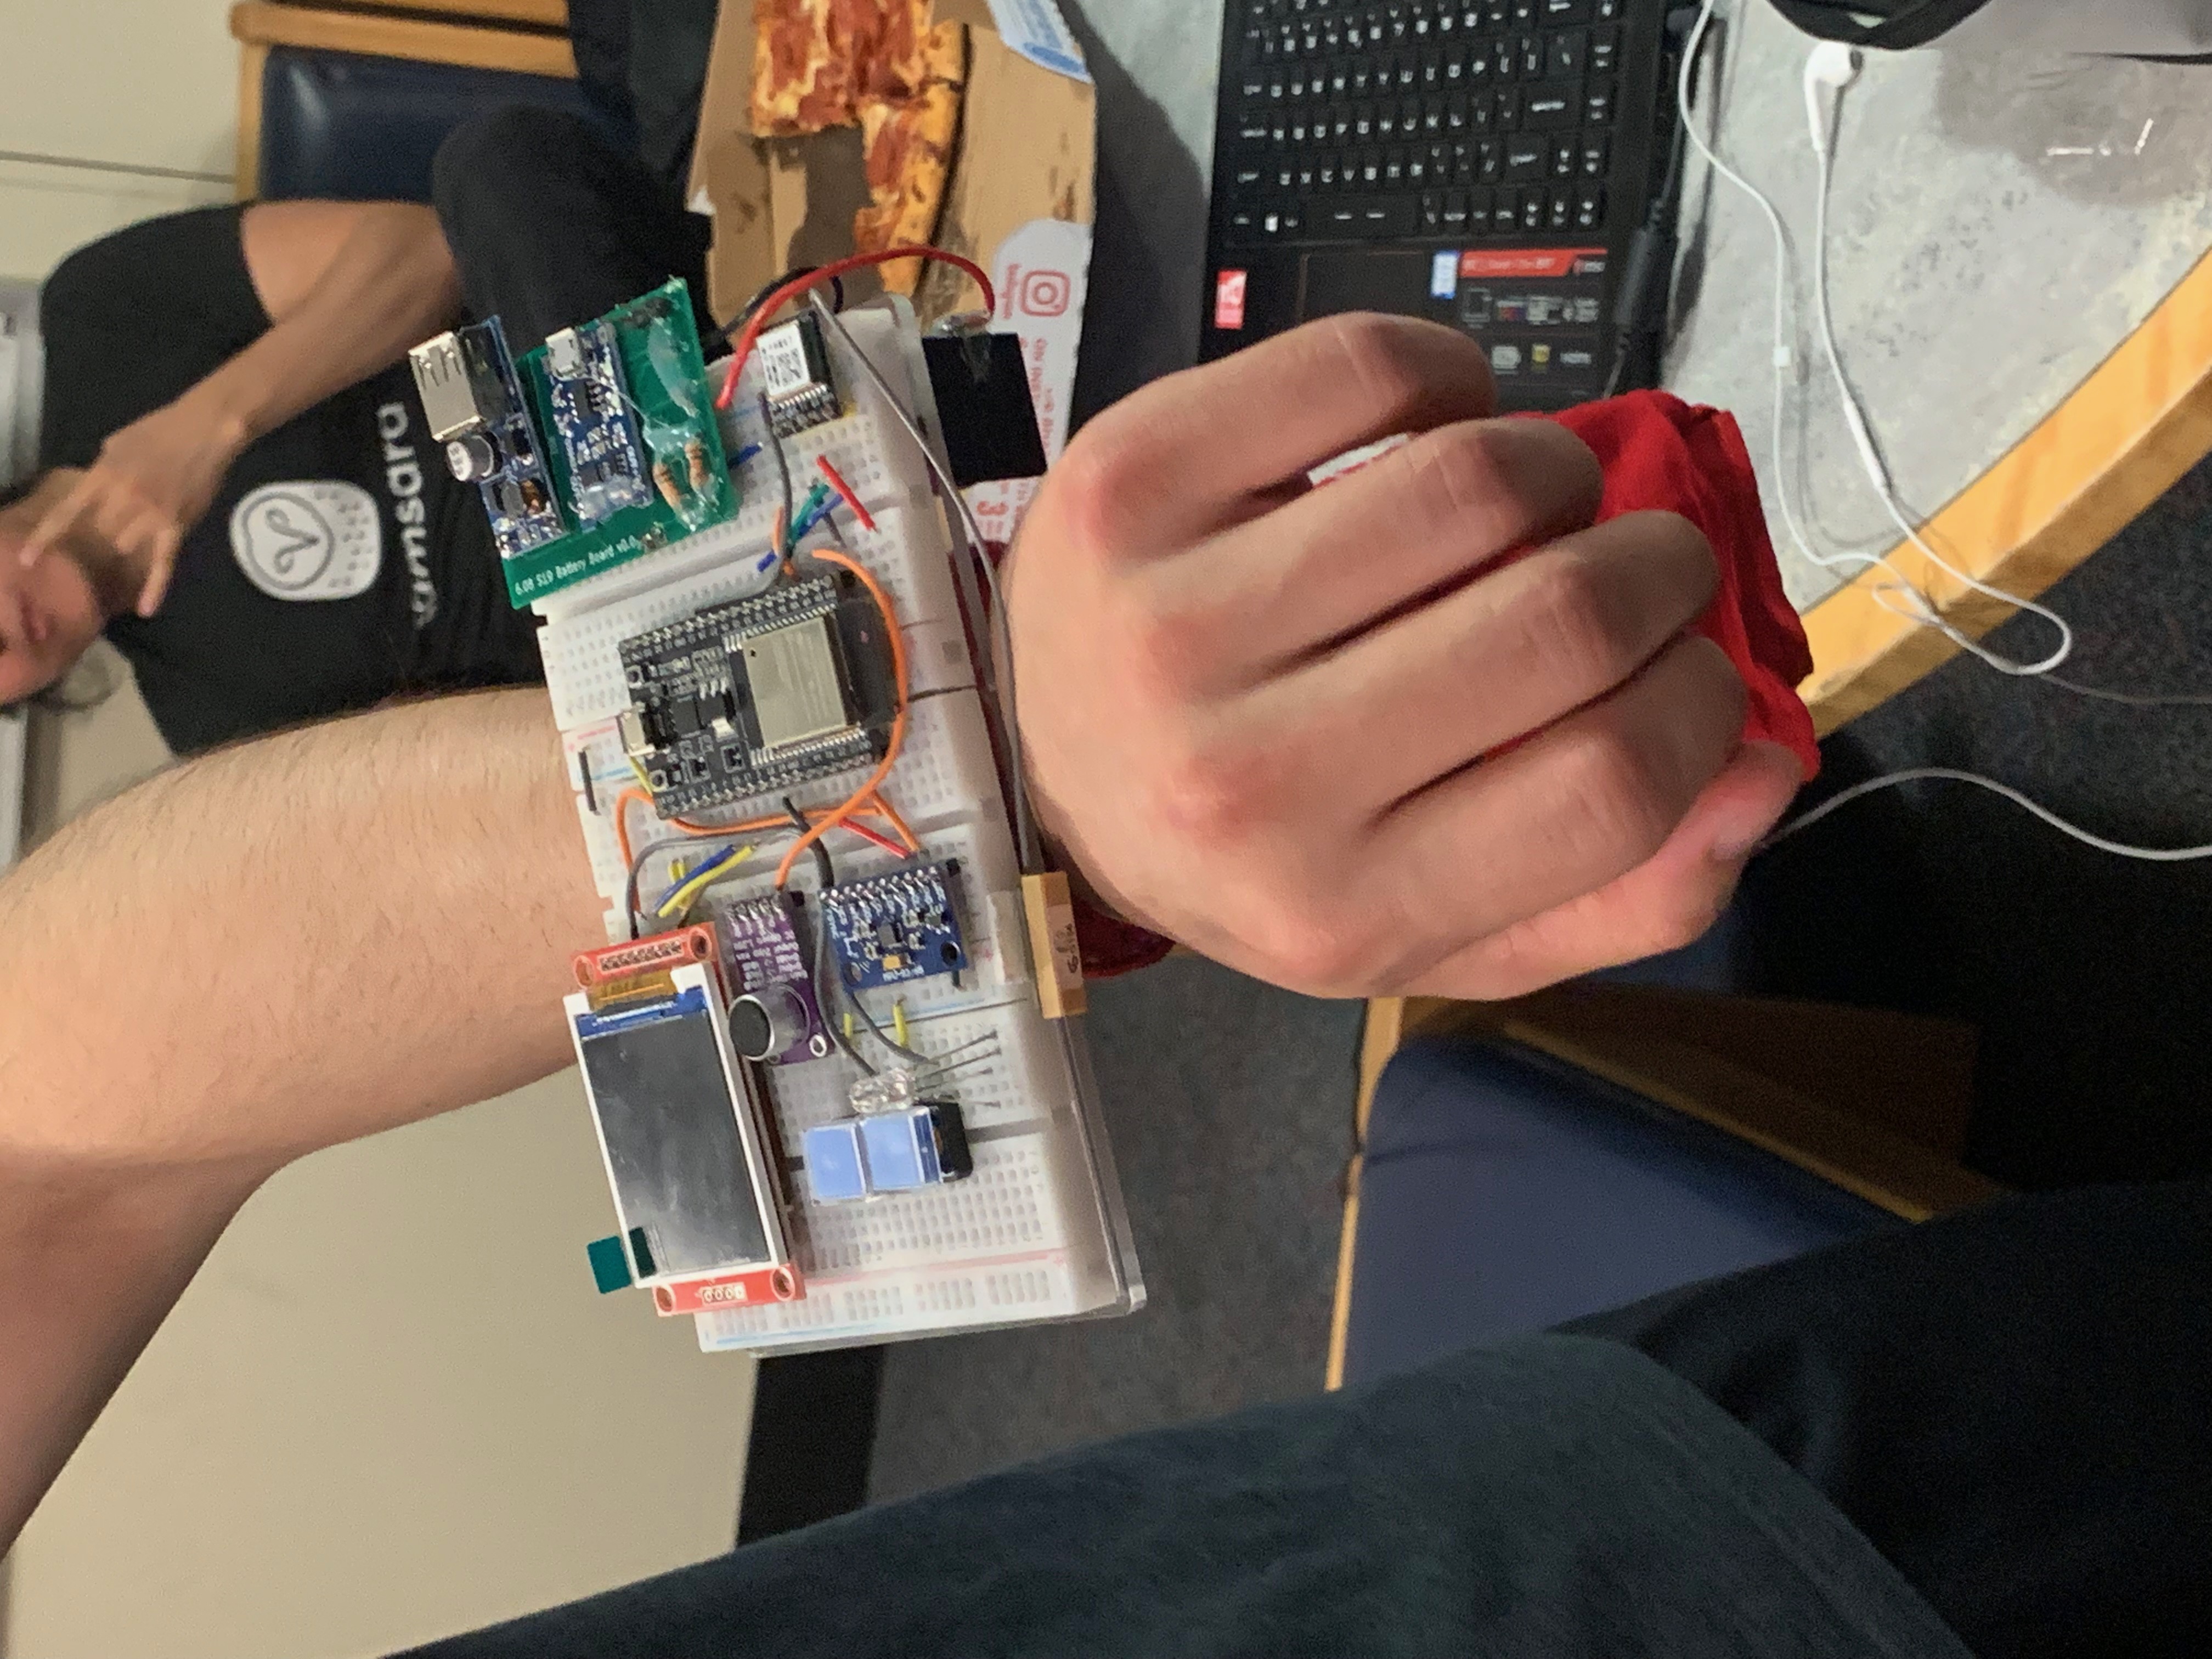
The wearable is something that the team pushed for the first few weeks. Initially, the plan was that the sensor which detects the lazer would be placed on the waist level and that the lazer would shoot from the arm as seen here.
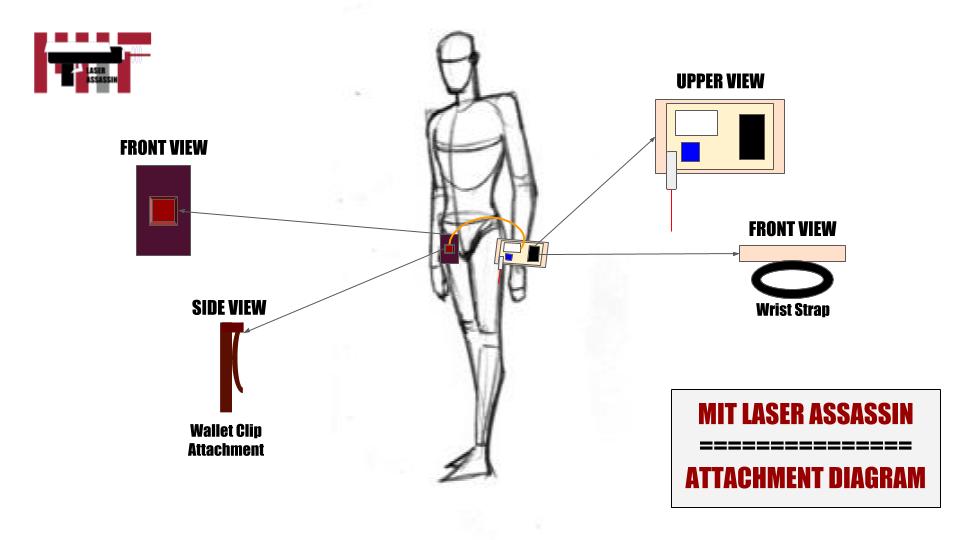
The entire sensor wearable was attached with velcro and consisted of a 3D printed housing with a spherical shape at the bottom. A phototransistor sits at the focal point of the sphere and aluminum foil is used to help capture the laser shot. Bare wires then connected the sensor to the ESP board where a laser could be fired with a button. A final version utilizes the same sensor housing attached to a player’s belt loop with adhesive. In addition, this iteration features a new mechanism of firing the laser using a banana shaped firing device.
### Sensor
Before the sensor was attached, it went through several iterations. The first version consisted of the sensor being simply a photoresistor. This was our worst version and caused many problems. The photoresistor could easily detect natural light and would result in false “kills” in our game. Additionally, trying to target the photoresistor with a laser proved to be very tedious and would make our game not as fun as it should be. The photoresistor also had a poor response time in returning values. After one of our first meetings, we were presented with phototransistors and switched our sensor to include this component as it returned values to the degree of nanoseconds. A sample of this version of the sensor can be seen here. Although it had the faster reading time, it still had the issue of reporting false “kills” when exposed to too much natural light from the sun.

Afterwards, in order to make the sensor easier to hit, we implemented a layer of aluminum foil to go on top of the phototransistor. This made the phototransistor much easier to hit with a laser shot but unfortunately, was too janky on top of our bradboard. This version of the sensor can be seen here.

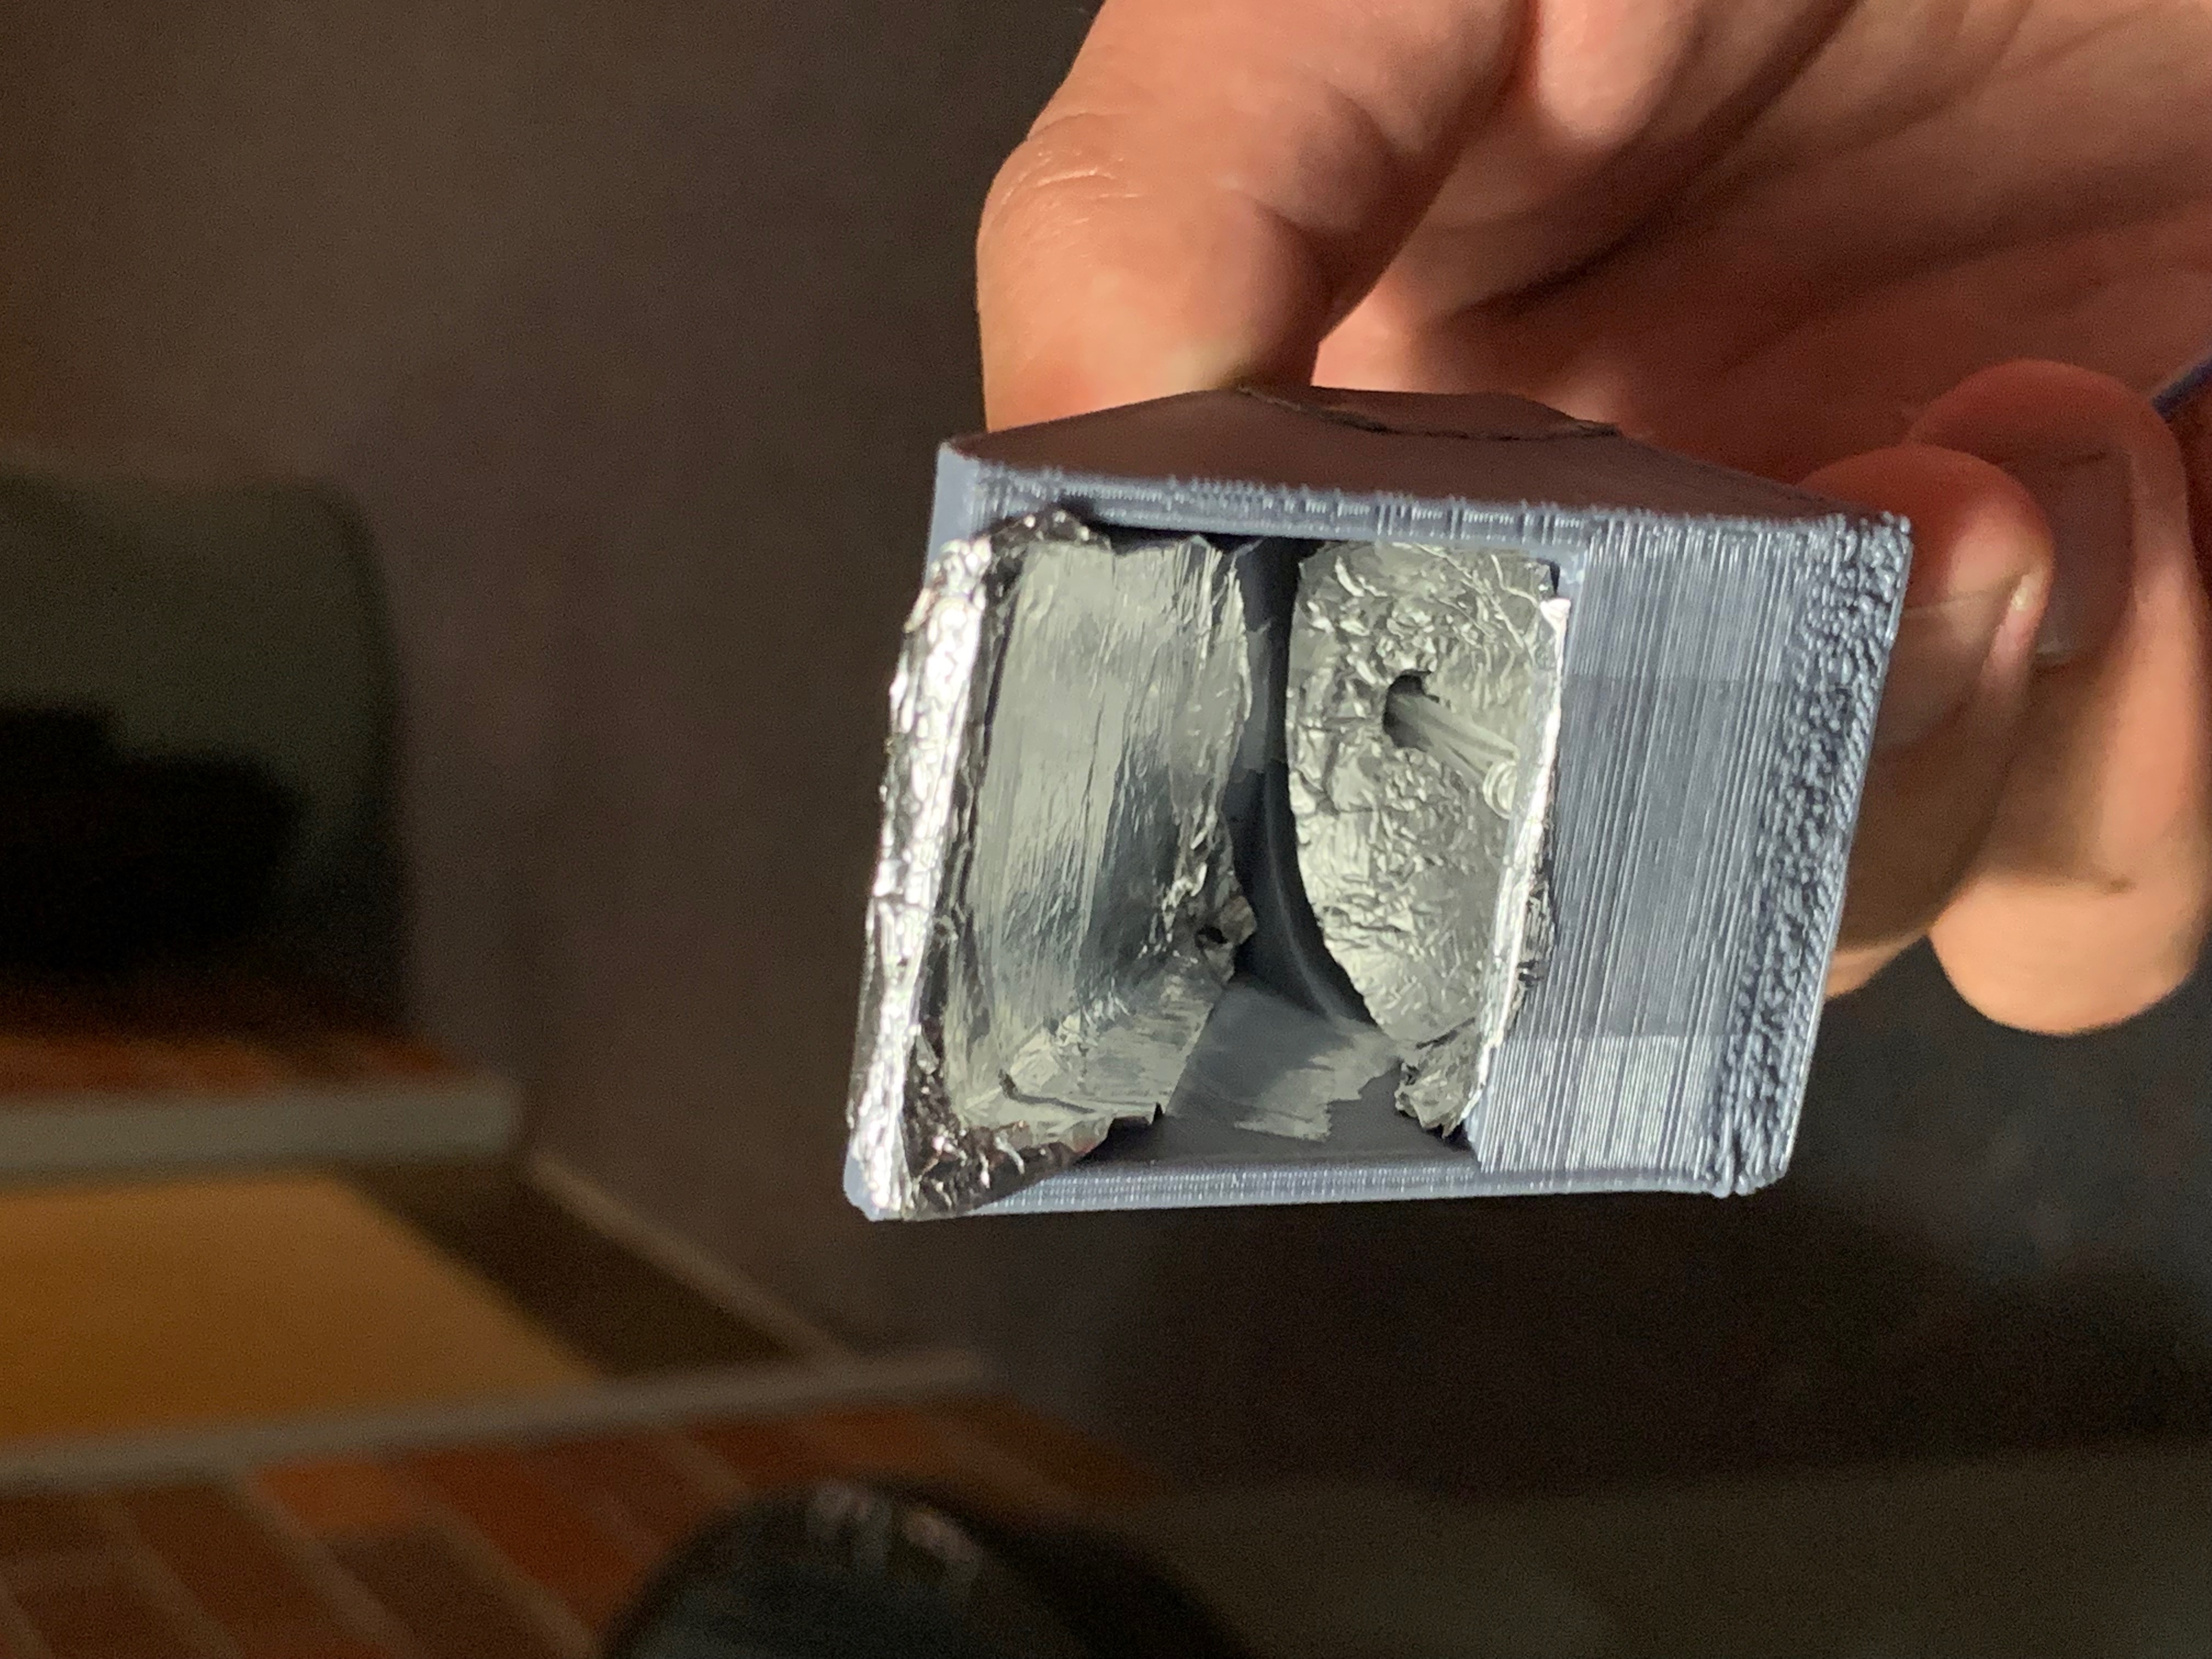
Finally, in order to adequately solve all current issues, a 3D printed part was designed to hold the phototransistor and aluminum foil. This design is used in our final product and is made of a hollow rectangular prism with a right triangular prism stacked on top of it.
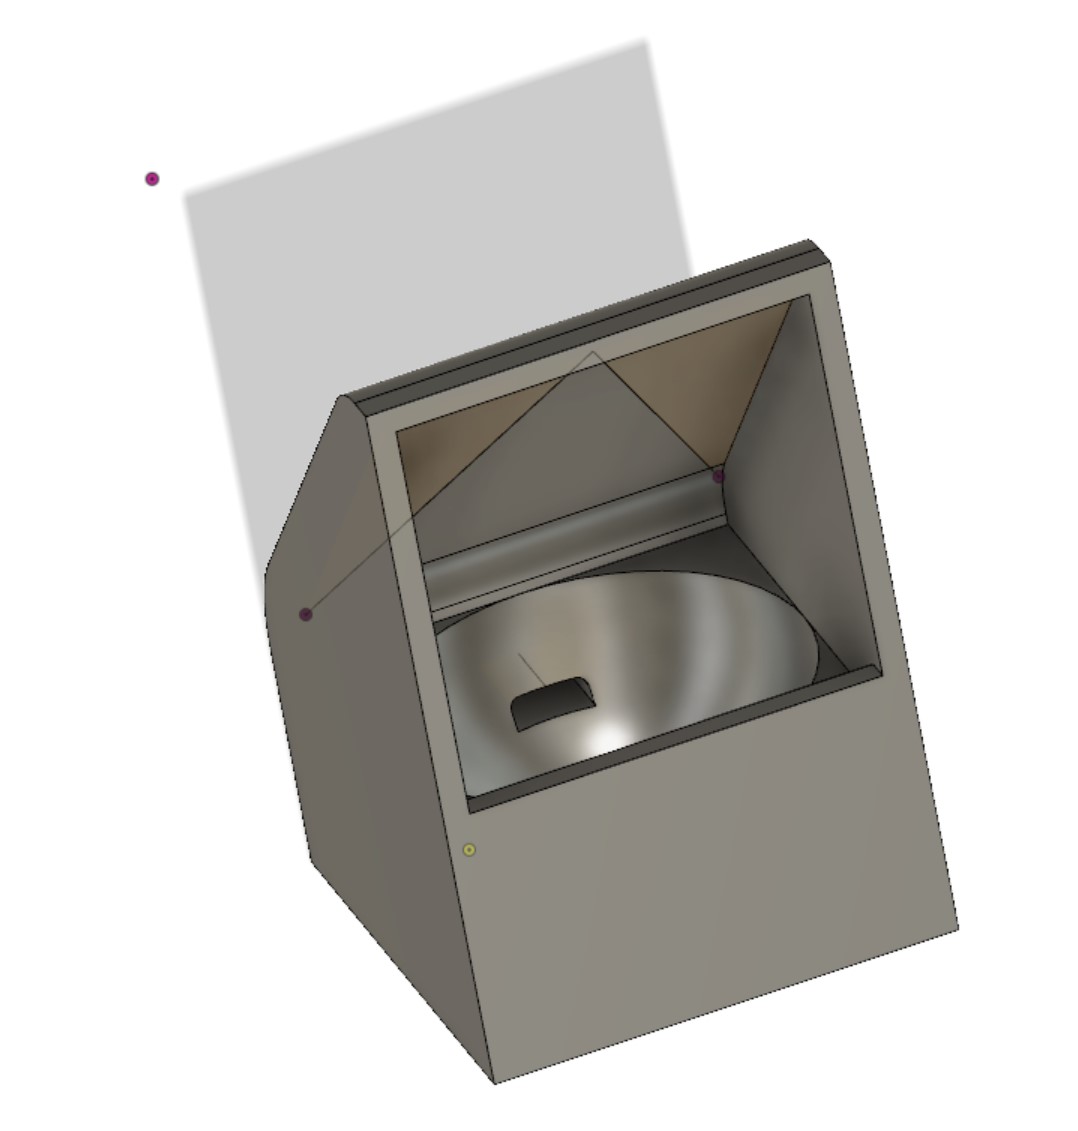
The unique shape helps block out all the excess natural light so that the phototransistor never registers a false kill due to the sun. Additionally, the shape allows for a player to simply aim for the larger surface area of the aluminum foil in order to register a proper hit vs simply requiring one to hit the phototransistor head on. Finally, the entire shape has a small slot in the back that allowed the wired phototransistor to be hooked up to the rest of the circuit board. The back of the shape was then attached with tape in order to be able to lock on to a player’s belt loop.

### Firing Mechanism
In order to fire our lasers, we initially kept the laser firing from the ESP breadboard using a button. This initially did the trick as serving as our shooting mechanism but proved to be very heavy on the player when it was worn and was not balanced.
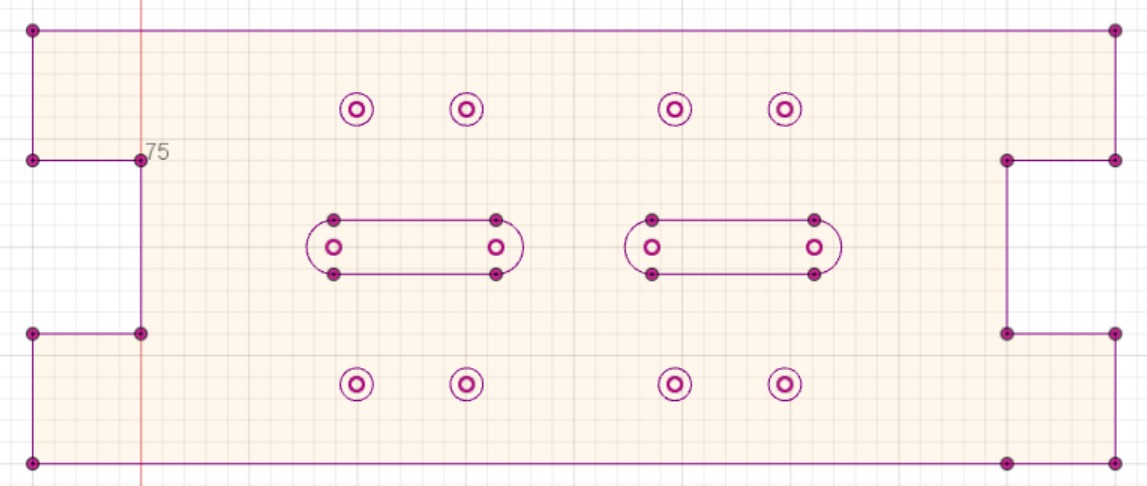
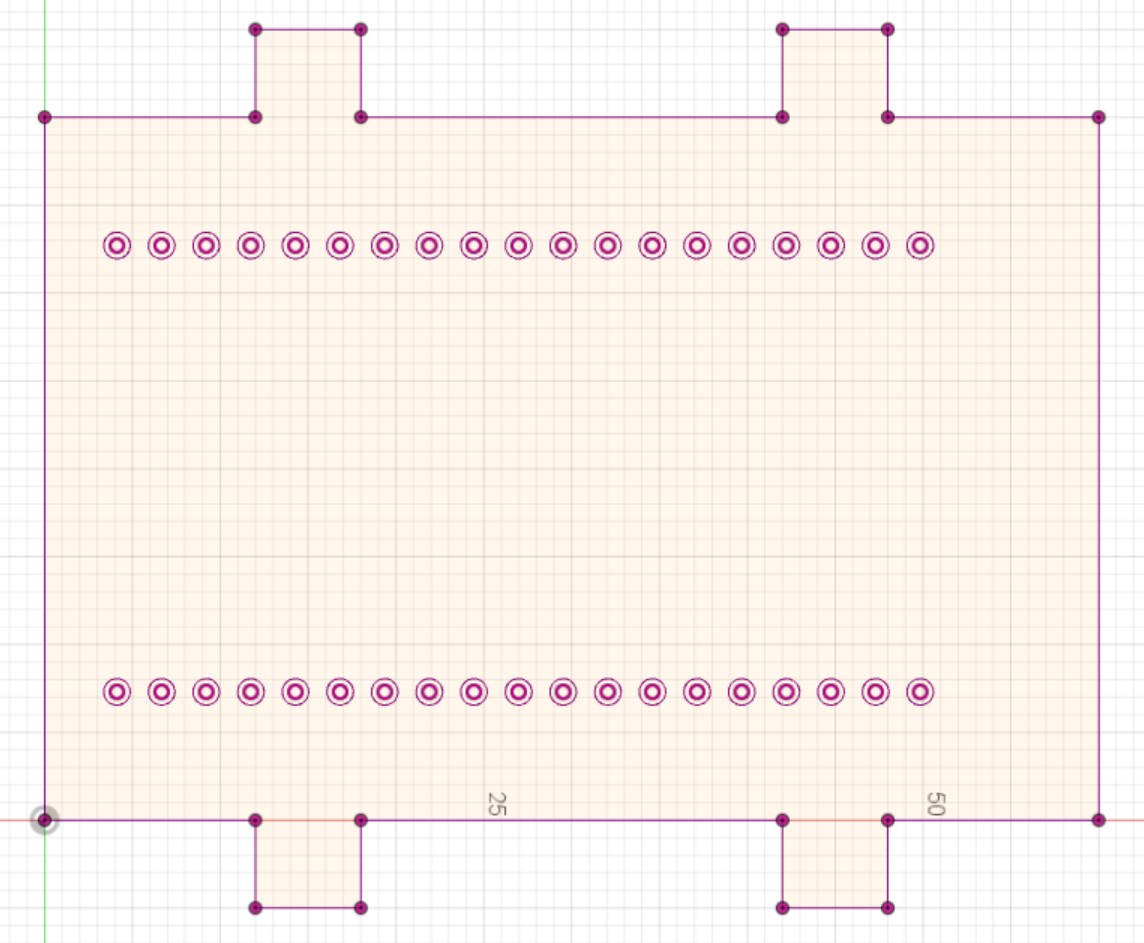
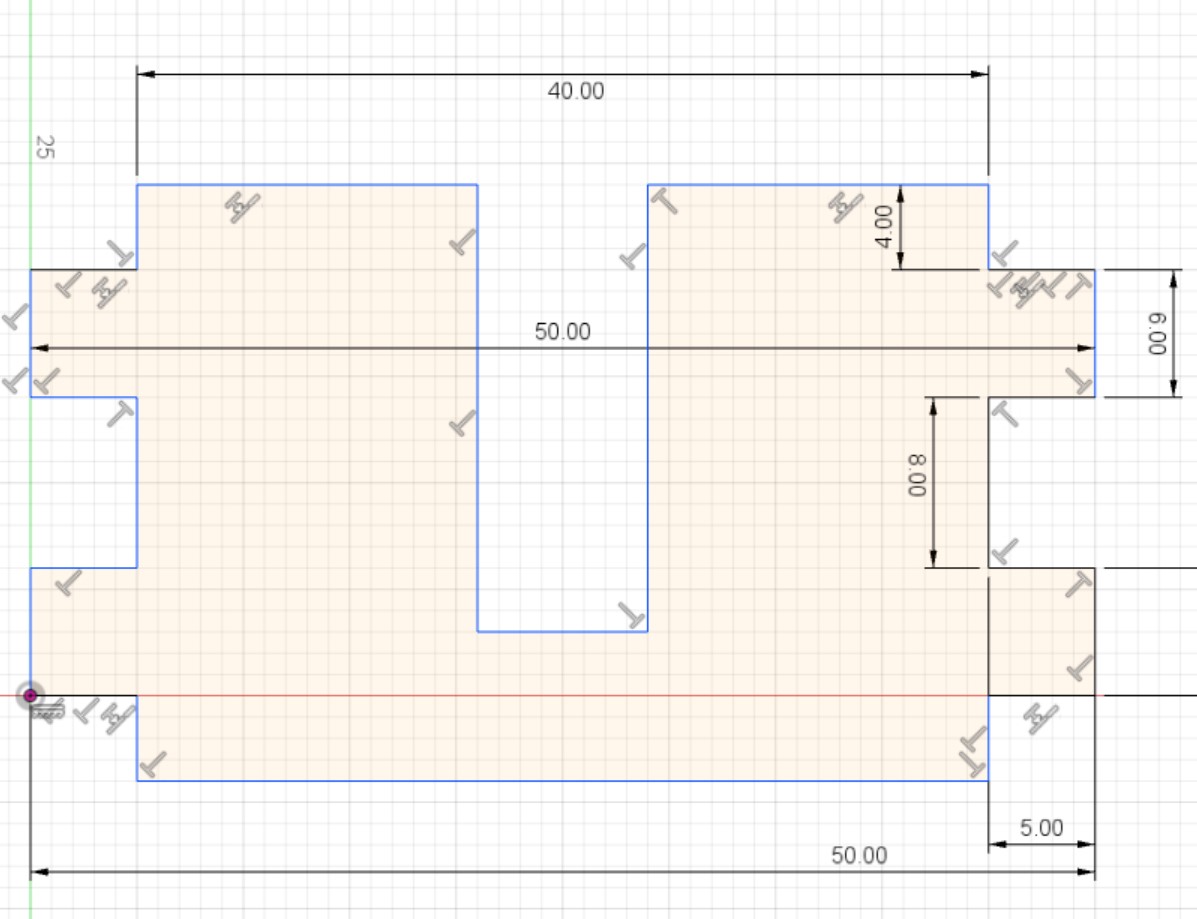
For the final design, we created a firing mechanism out of acrylic that was in the shape of a banana. These sheets of acrylic were cut into the right size using a laser cutter. This design made the entire mechanism much more compact and made the wearable feel more like a laser shooting gun which is traditional to the laser tag experience. There were two types of acrylic used for this component of our game. ¼ inch, clear acrylic was used to make the outer shell of the banana that held all the parts in between. The design for the banana is shown here.

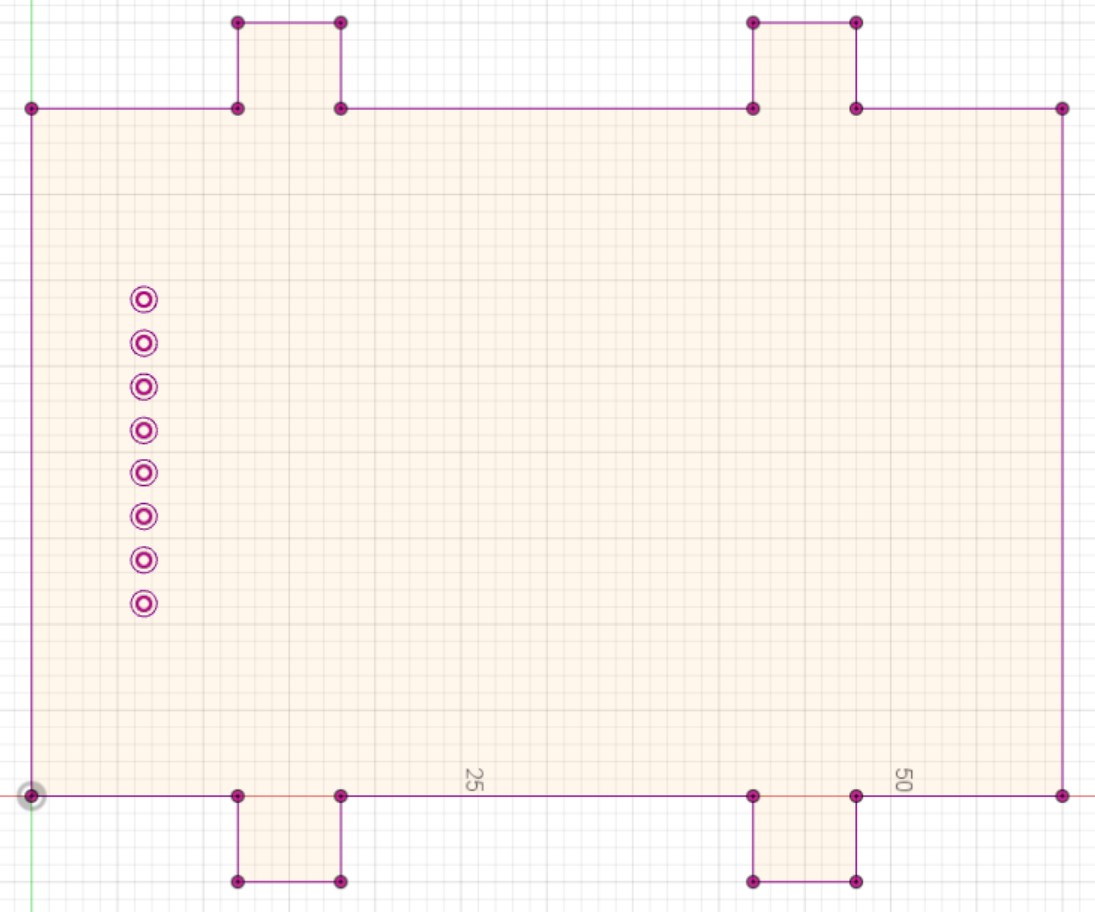
Additionally, 1/16 inch, black acrylic was then inserted into slots in the banana frame in order to hold all the hardware of our laser shooter inside the banana. The LCD screen, laser pointer, buttons, ESP32, and batter board were all attached to this mechanism. Designs for these component holders can be seen here.
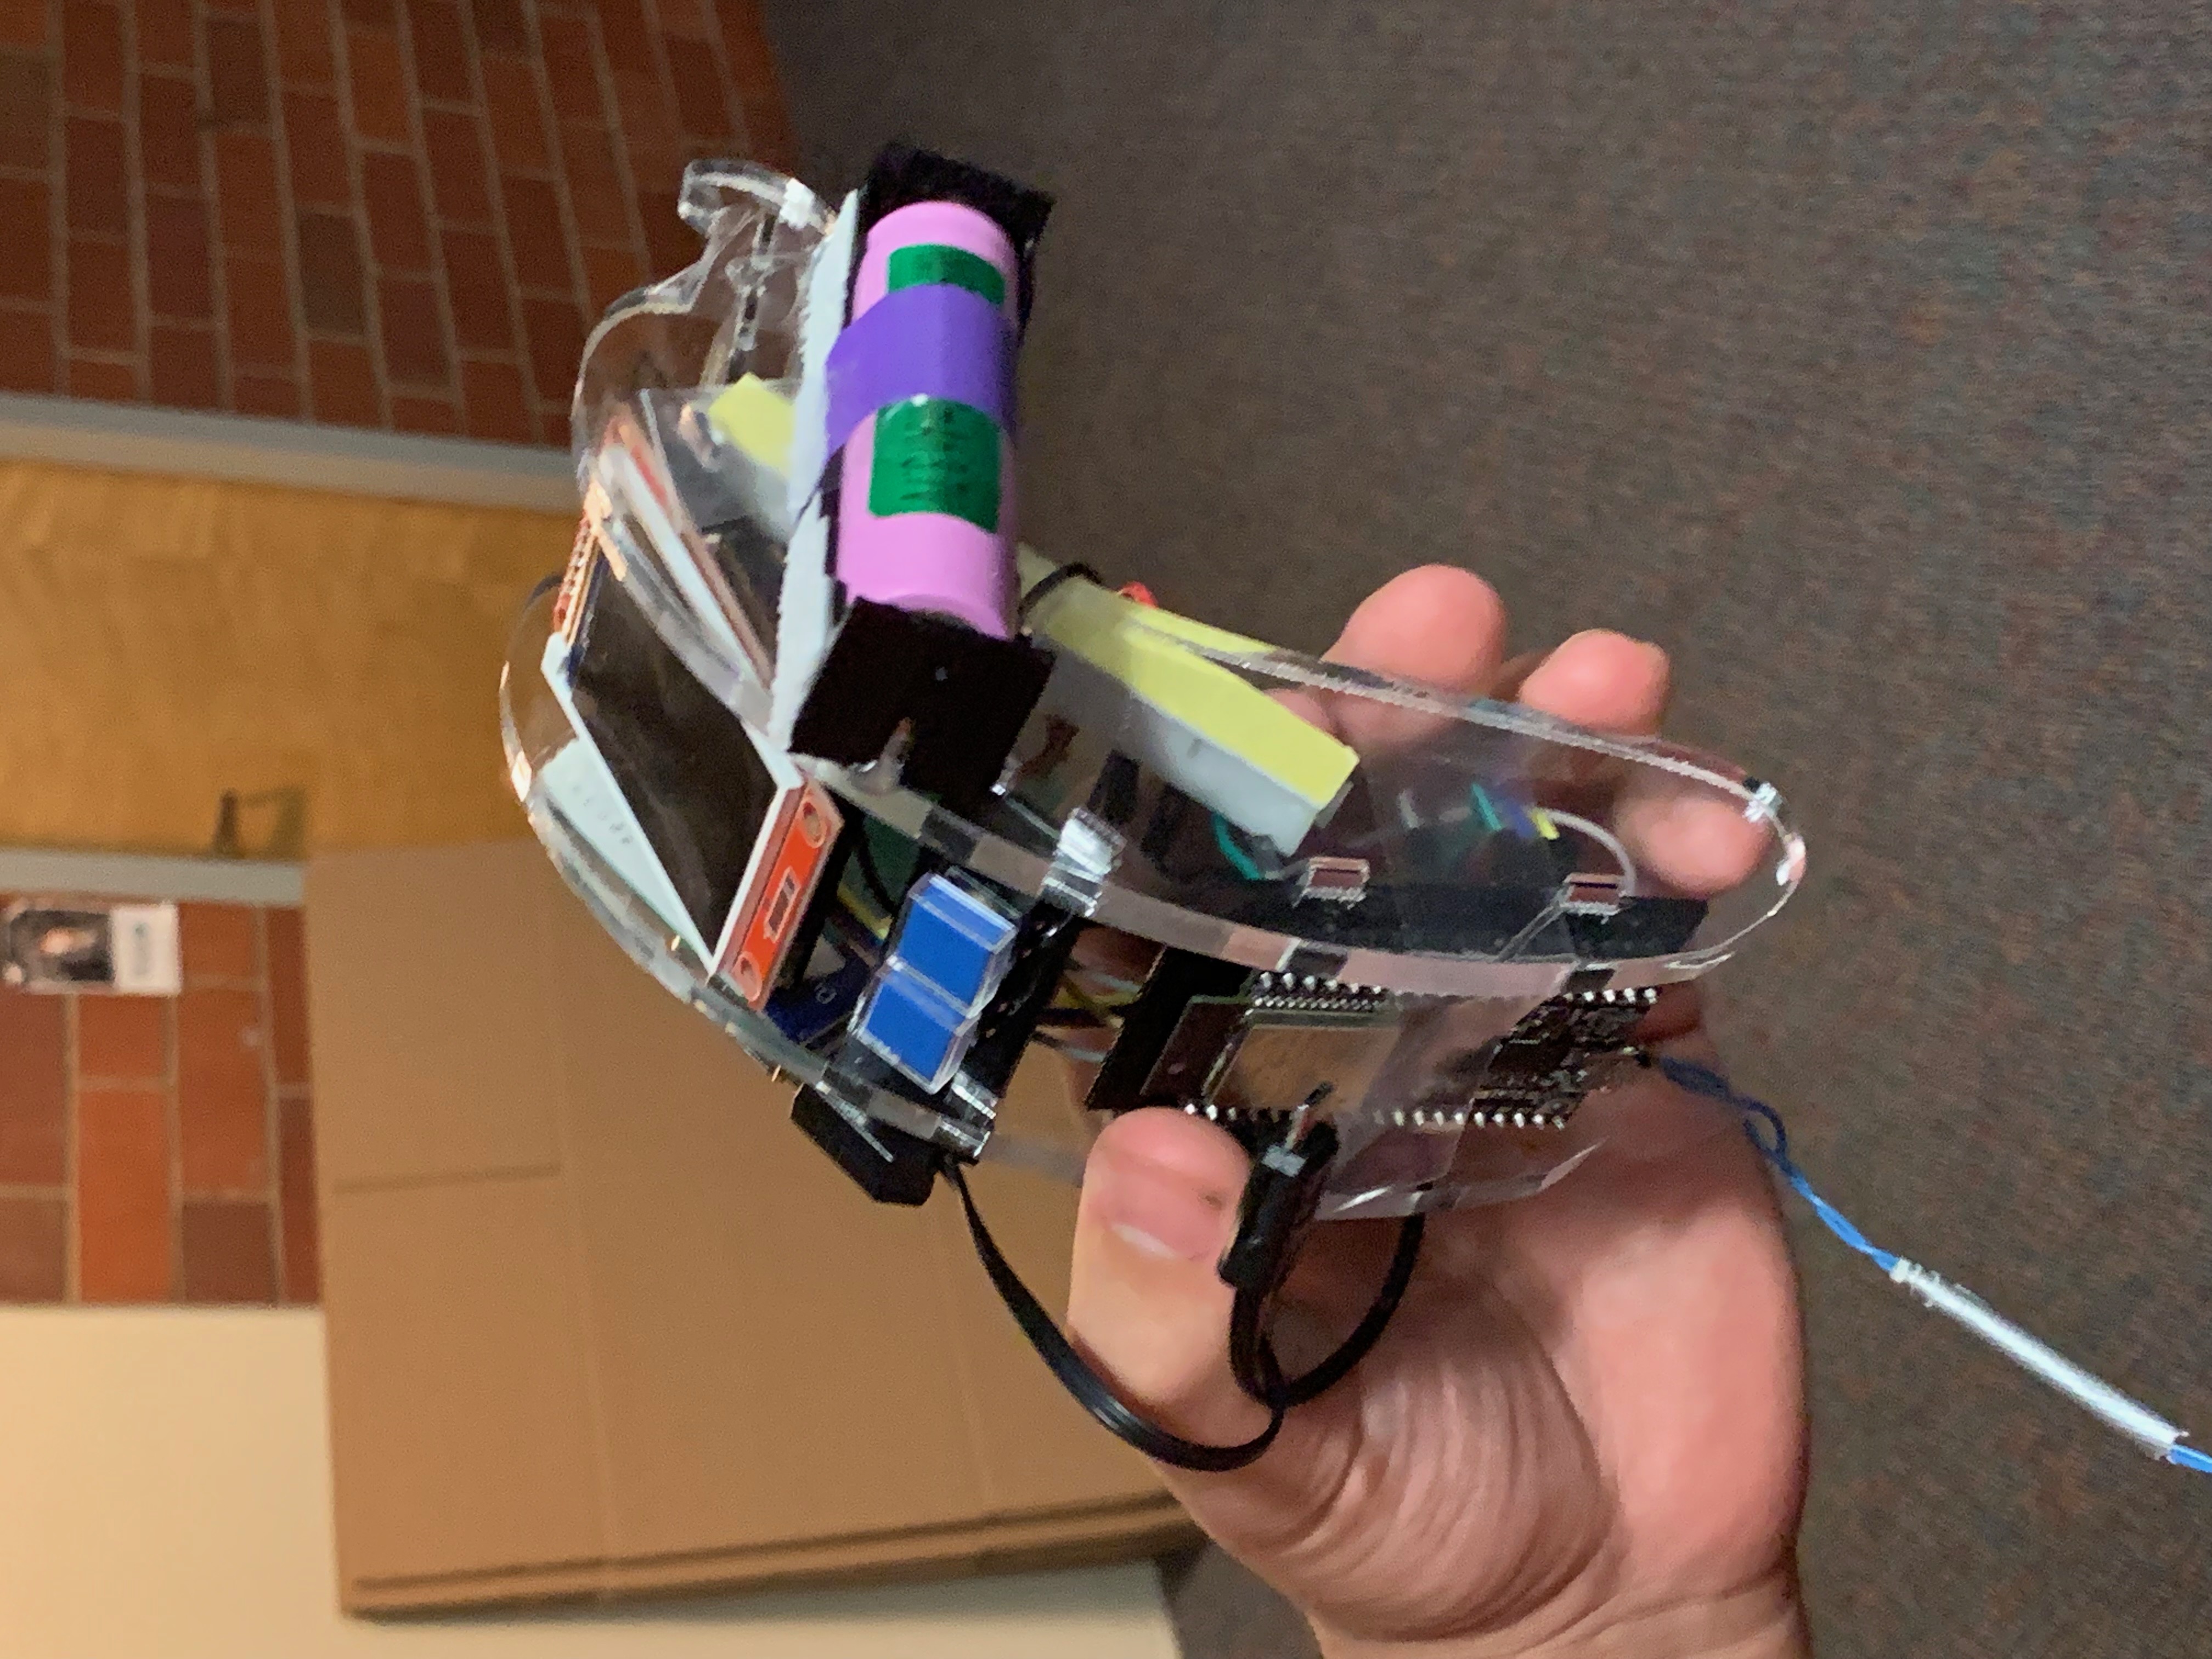
The final version of the banana shooter can be seen below.
## **Software**
### Blocking Code
One of the biggest problems that arose early in development was that requests using the Google geolocation API resulted in unavoidable blocking in the code that we had to work around. We adapted to this issue by limiting the amount of API request to only when it was absolutely necessary for the game. Of course, this resulted in slightly delayed predictions of player locations, however we were able to make it so that the player at least knew where they were in relation to the map whenever a map update occurred, making it so the players were never excessively disadvantaged during the game.
### Code Incorporation
Another large issue we faced was incorporating all the working pieces of individual code into a complete, working product. While GitHub helped in minimizing these difficulties, it was not able to solve the problem outright. We were able to solve this issue for the most part by making our individual codes as modular as possible, making integrating most pieces as simple as placing function calls into a state machine.
### Server/Client Code Distribution
One of the smaller issues we had with software development was deciding where to place certain aspects of the game. For example, we had initially built a randomizer function on the ESP side which was used to decide the center of the circle. However, as development continued, we made the decision to handle all aspects relating to the circle locally on the ESP which made deciding the circle center locally a synchronization issue. As such, we had to move this functionality to the server side to ensure that every player had the circle location.
### Modulation
We also had software issues with detecting when a laser is hitting the sensor. We were having issues with other light sources reading as laser input, particularly the sun, so we couldn't simply look at when there was bright light on the sensor, as we would get many false positives.
Another consideration we had was how to determine who shot who when a kill *was* detected. At first, we planned to simply compare the times that shots were made on the server, but this proved to have several issues. First, both the sending and recieving ESPs would be communicating with the server simultaneously, which meant the detection would be inconsistent. Furthermore, if two players shot their lasers in completely different locations but at the same time, we wouldn't know which of those was the successful shot.
To solve this, we decided on implementing modulation in the firing of our laser. The sun doesn't blink, so detecting only pulses instead of just brightness would allow us to eliminate the broad majority of interference with other light sources. And by giving each player a different pulse length, a user who had been shot would easily be able to tell who shot them, assuming we were able to detect the modulation (we can!).
### Indoor GPS Problems
Our game was intended to be played both indoors and outdoors, as it was meant to be distributed across the whole campus. However, we quickly learned that GPS absolutely does not work in side, and hardly worked outside some of the time. So we started to think about alternatives.
We knew that cell phones could find their location indoors or outdoors, and we had the idea to try to mimic the way that they use nearby WiFi routers that were previously mapped to triangulate location. After considering attempting to map these ourselves and deciding this would be way too much work, we realized that someone else (Google) had definitely done this before. So we researched, and found that Google had a Geolocation API that would do exactly what we wanted. It took in a set of nearby MAC addresses, and processed them to triangulate the user's location.
# Parts List
* Base 6.08 Kit
* 5mW Laser
* 1/4 inch clear Acrylic
* 1/16 inch black Acrylic
* Velcro/Tape
* Phototransistor
# Code Documentation
## Main Game State Machine & Diagram

The play_game function contains the main game state machine. There are 6 states within this function, and most of these states contain smaller state machines for button-operated tasks.
Regardless of what state the player is in within the `play_game` function, there are certain operations that the ESP32 carries out almost constantly.
- Firstly, if the amount of players remaining in the game is `1`, the player goes to state `4` (the win state). If the player gets shot and they have a shield, the shield is removed. If the player gets shot and they don’t have a shield, they enter state 3 (the losing state).
- In states `0`, `1`, and `2`, the code also checks whether the player is within the allowed play area circle using the check_inside function. If they are outside of the circle for 30 seconds, they are moved into state 3 (the losing state).
### State `-1` (Join):
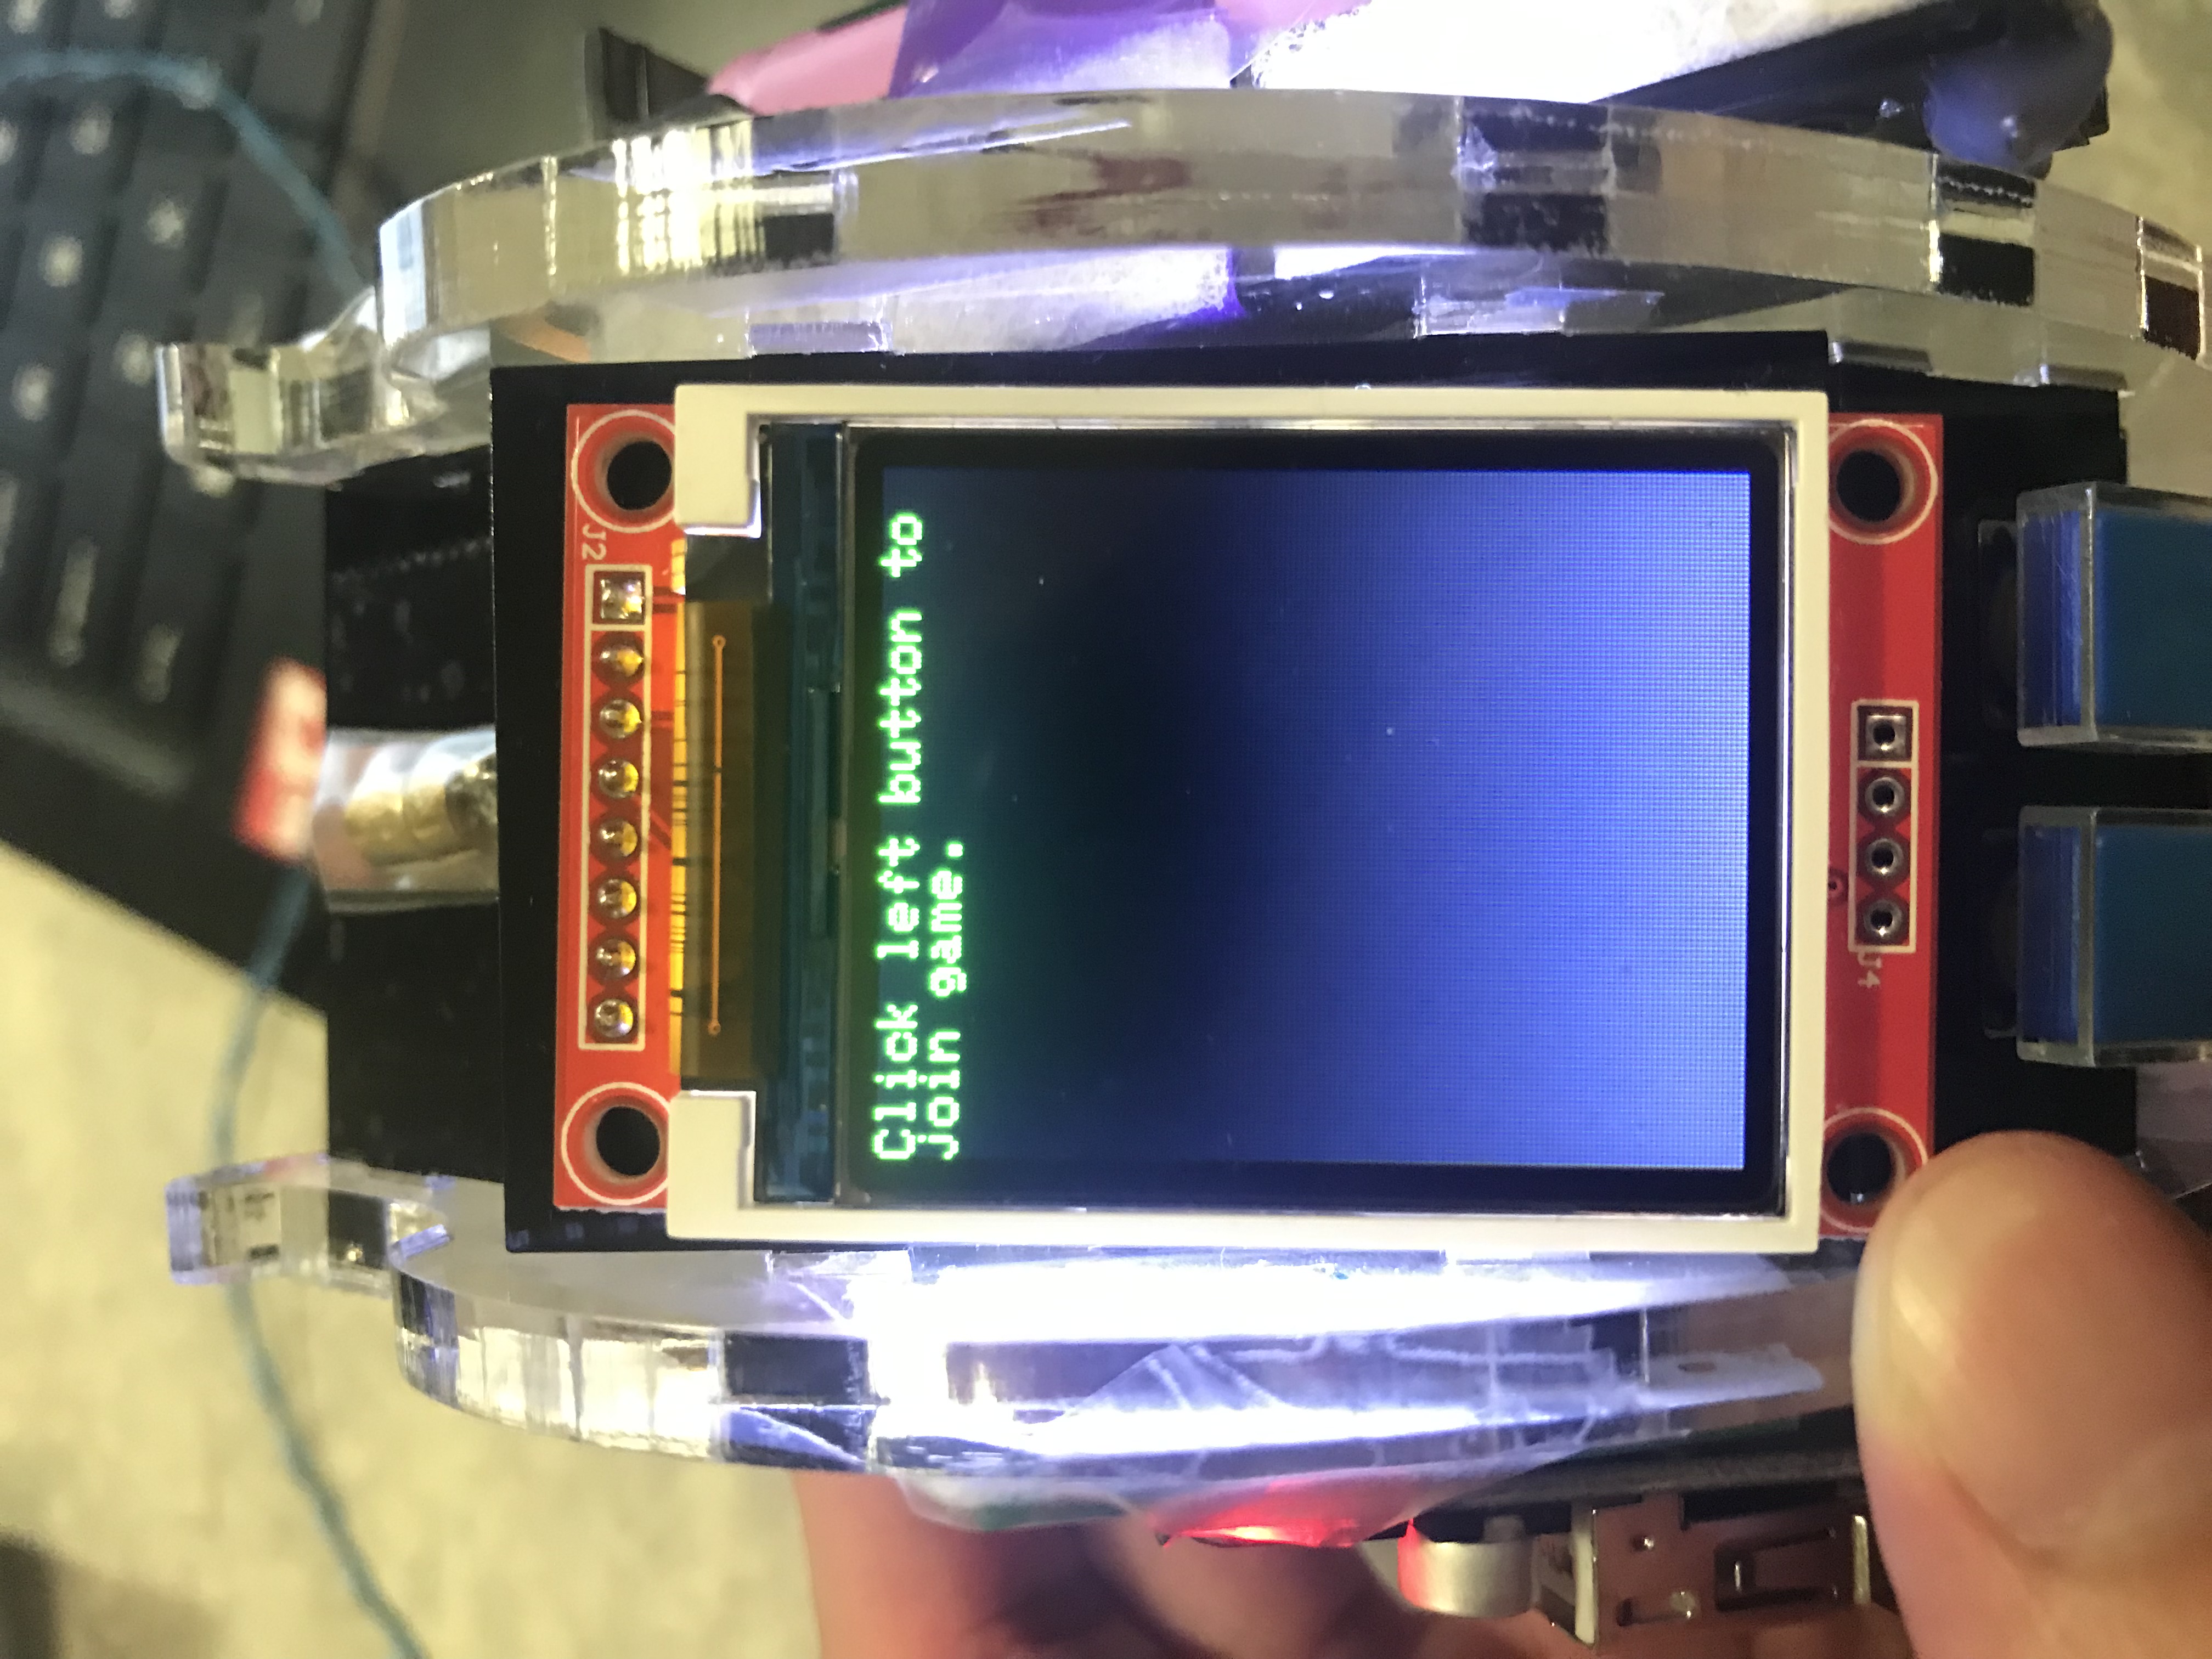
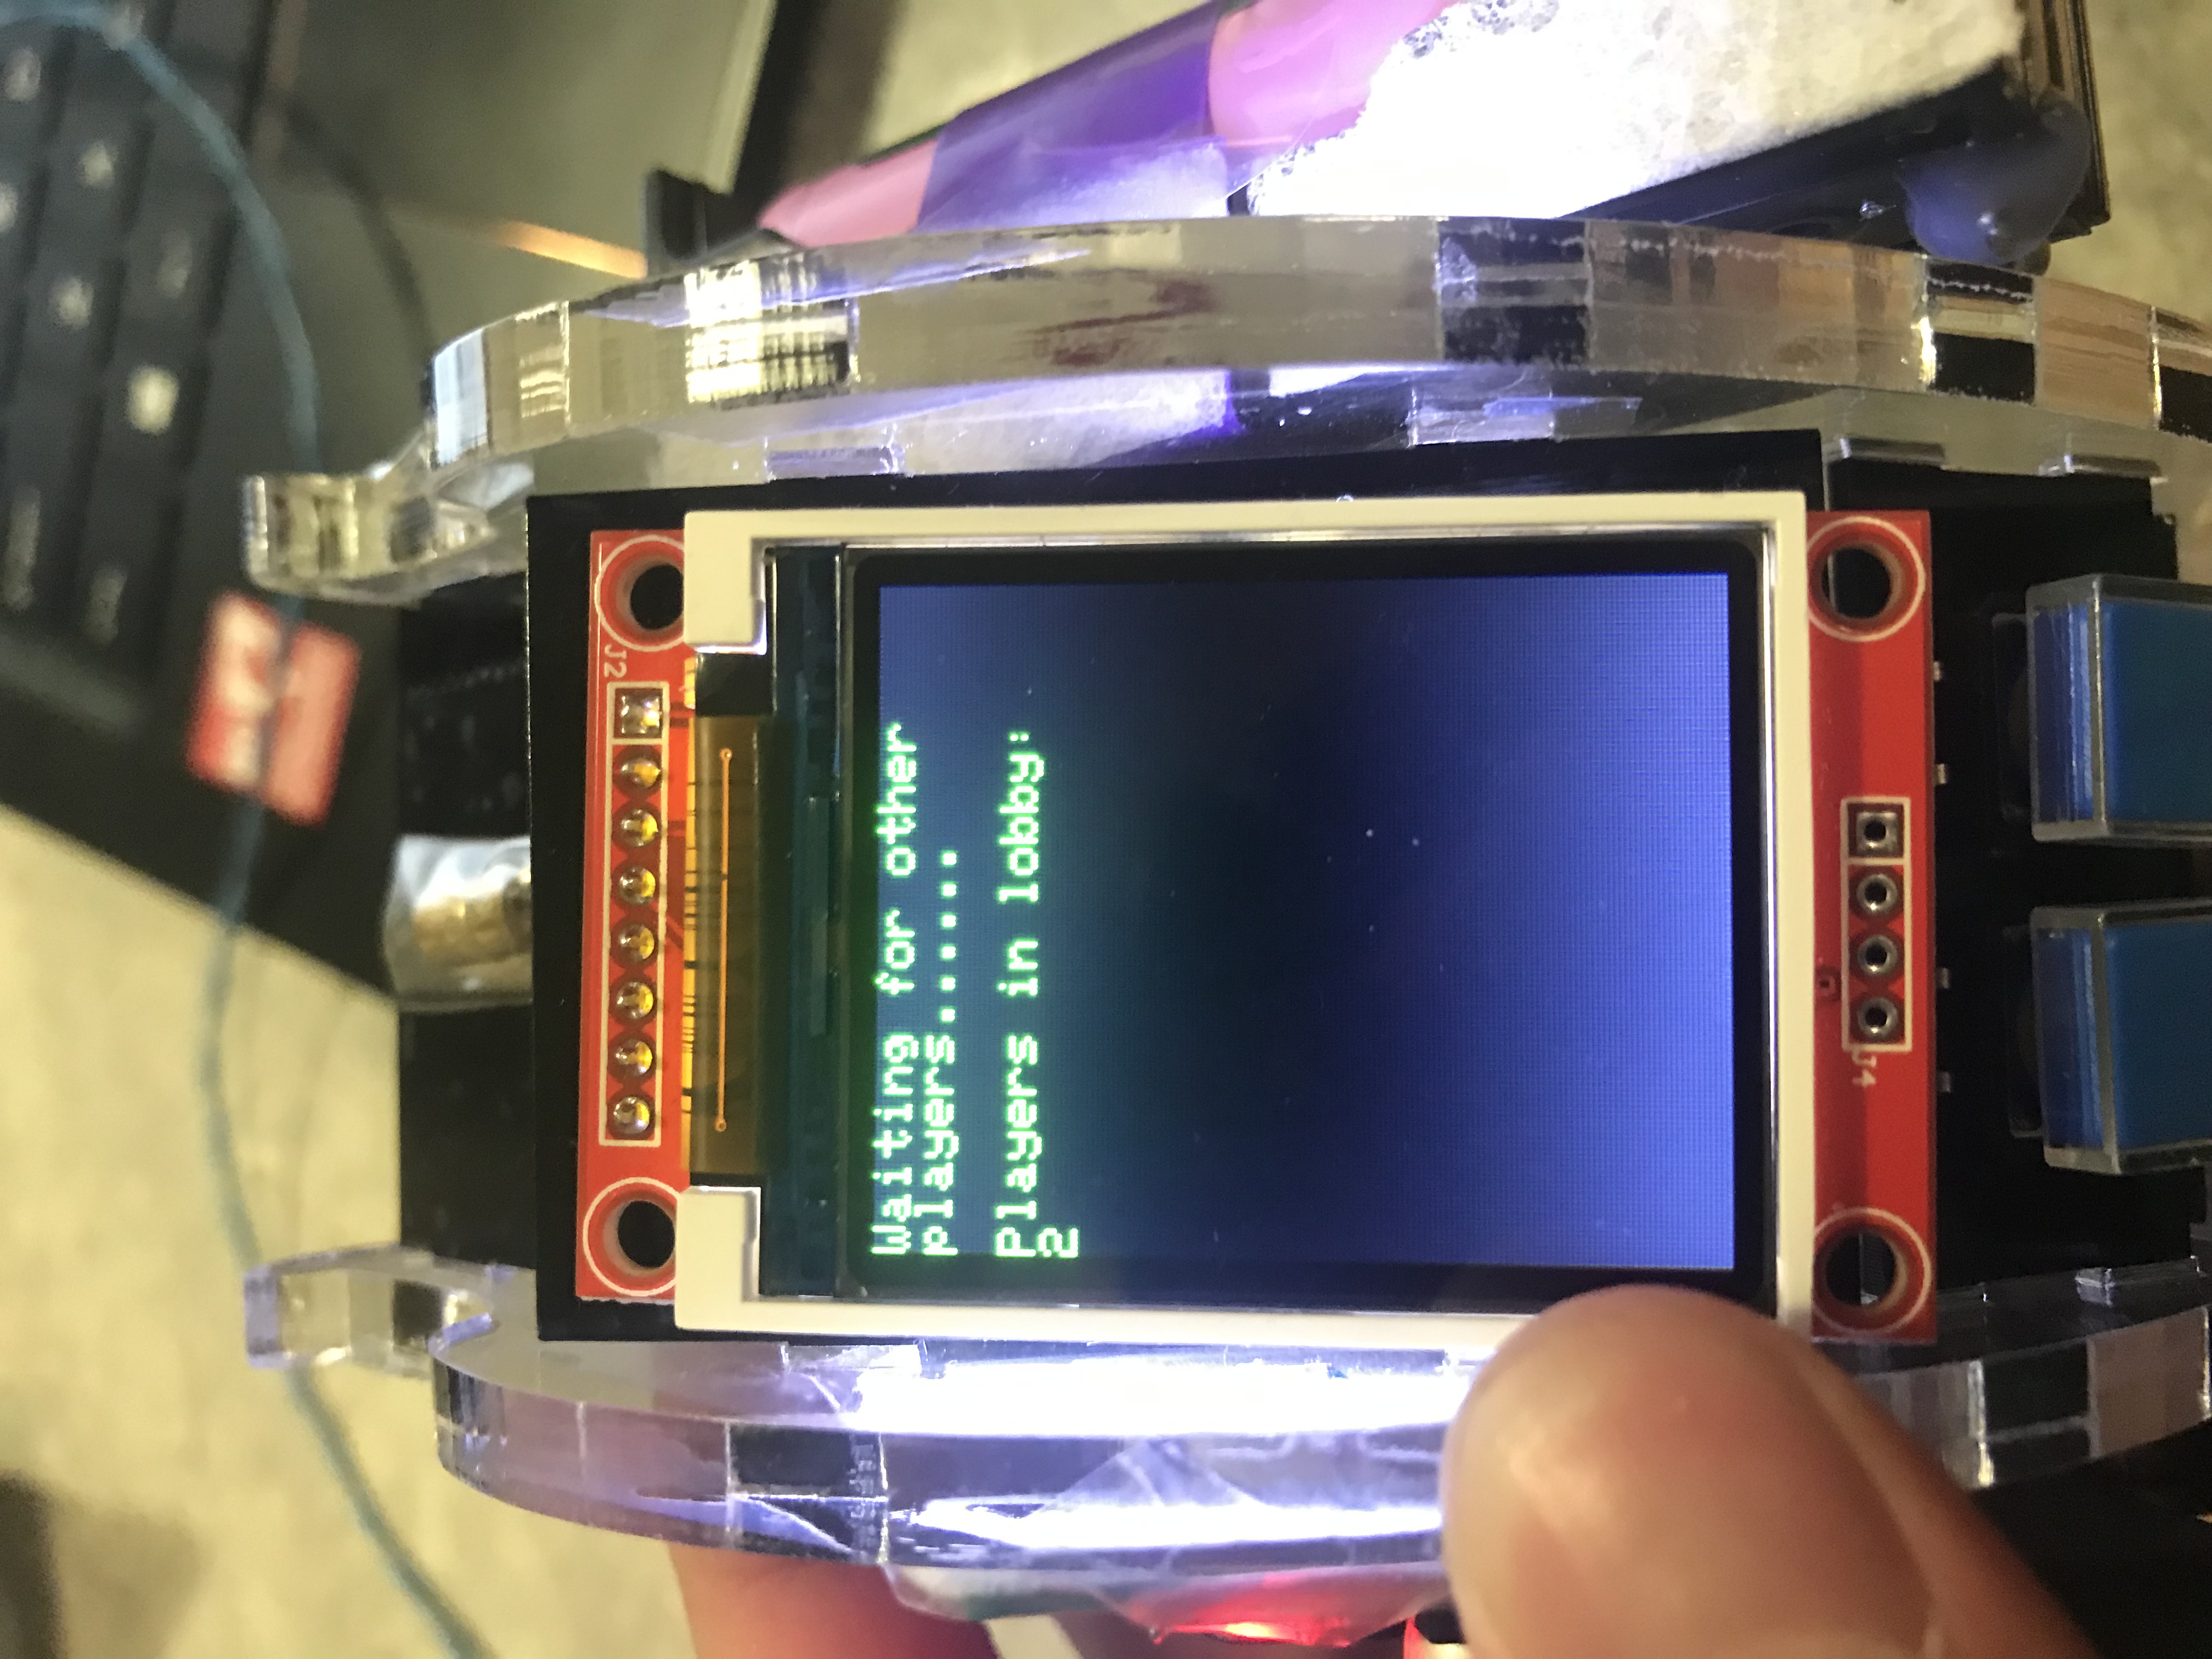
This is the join state (the first state the player enters when starting up the ESP32). In this state, the player can click the left button to enter the lobby (ESP32 tells the server that they are joining). The lobby notifies the player of how many people have joined and are waiting for the game to start by checking with the server repeatedly. Depending on the game size (determined in the code), once a certain player count is reached, players will enter state 0.
### State `0` (Menu):
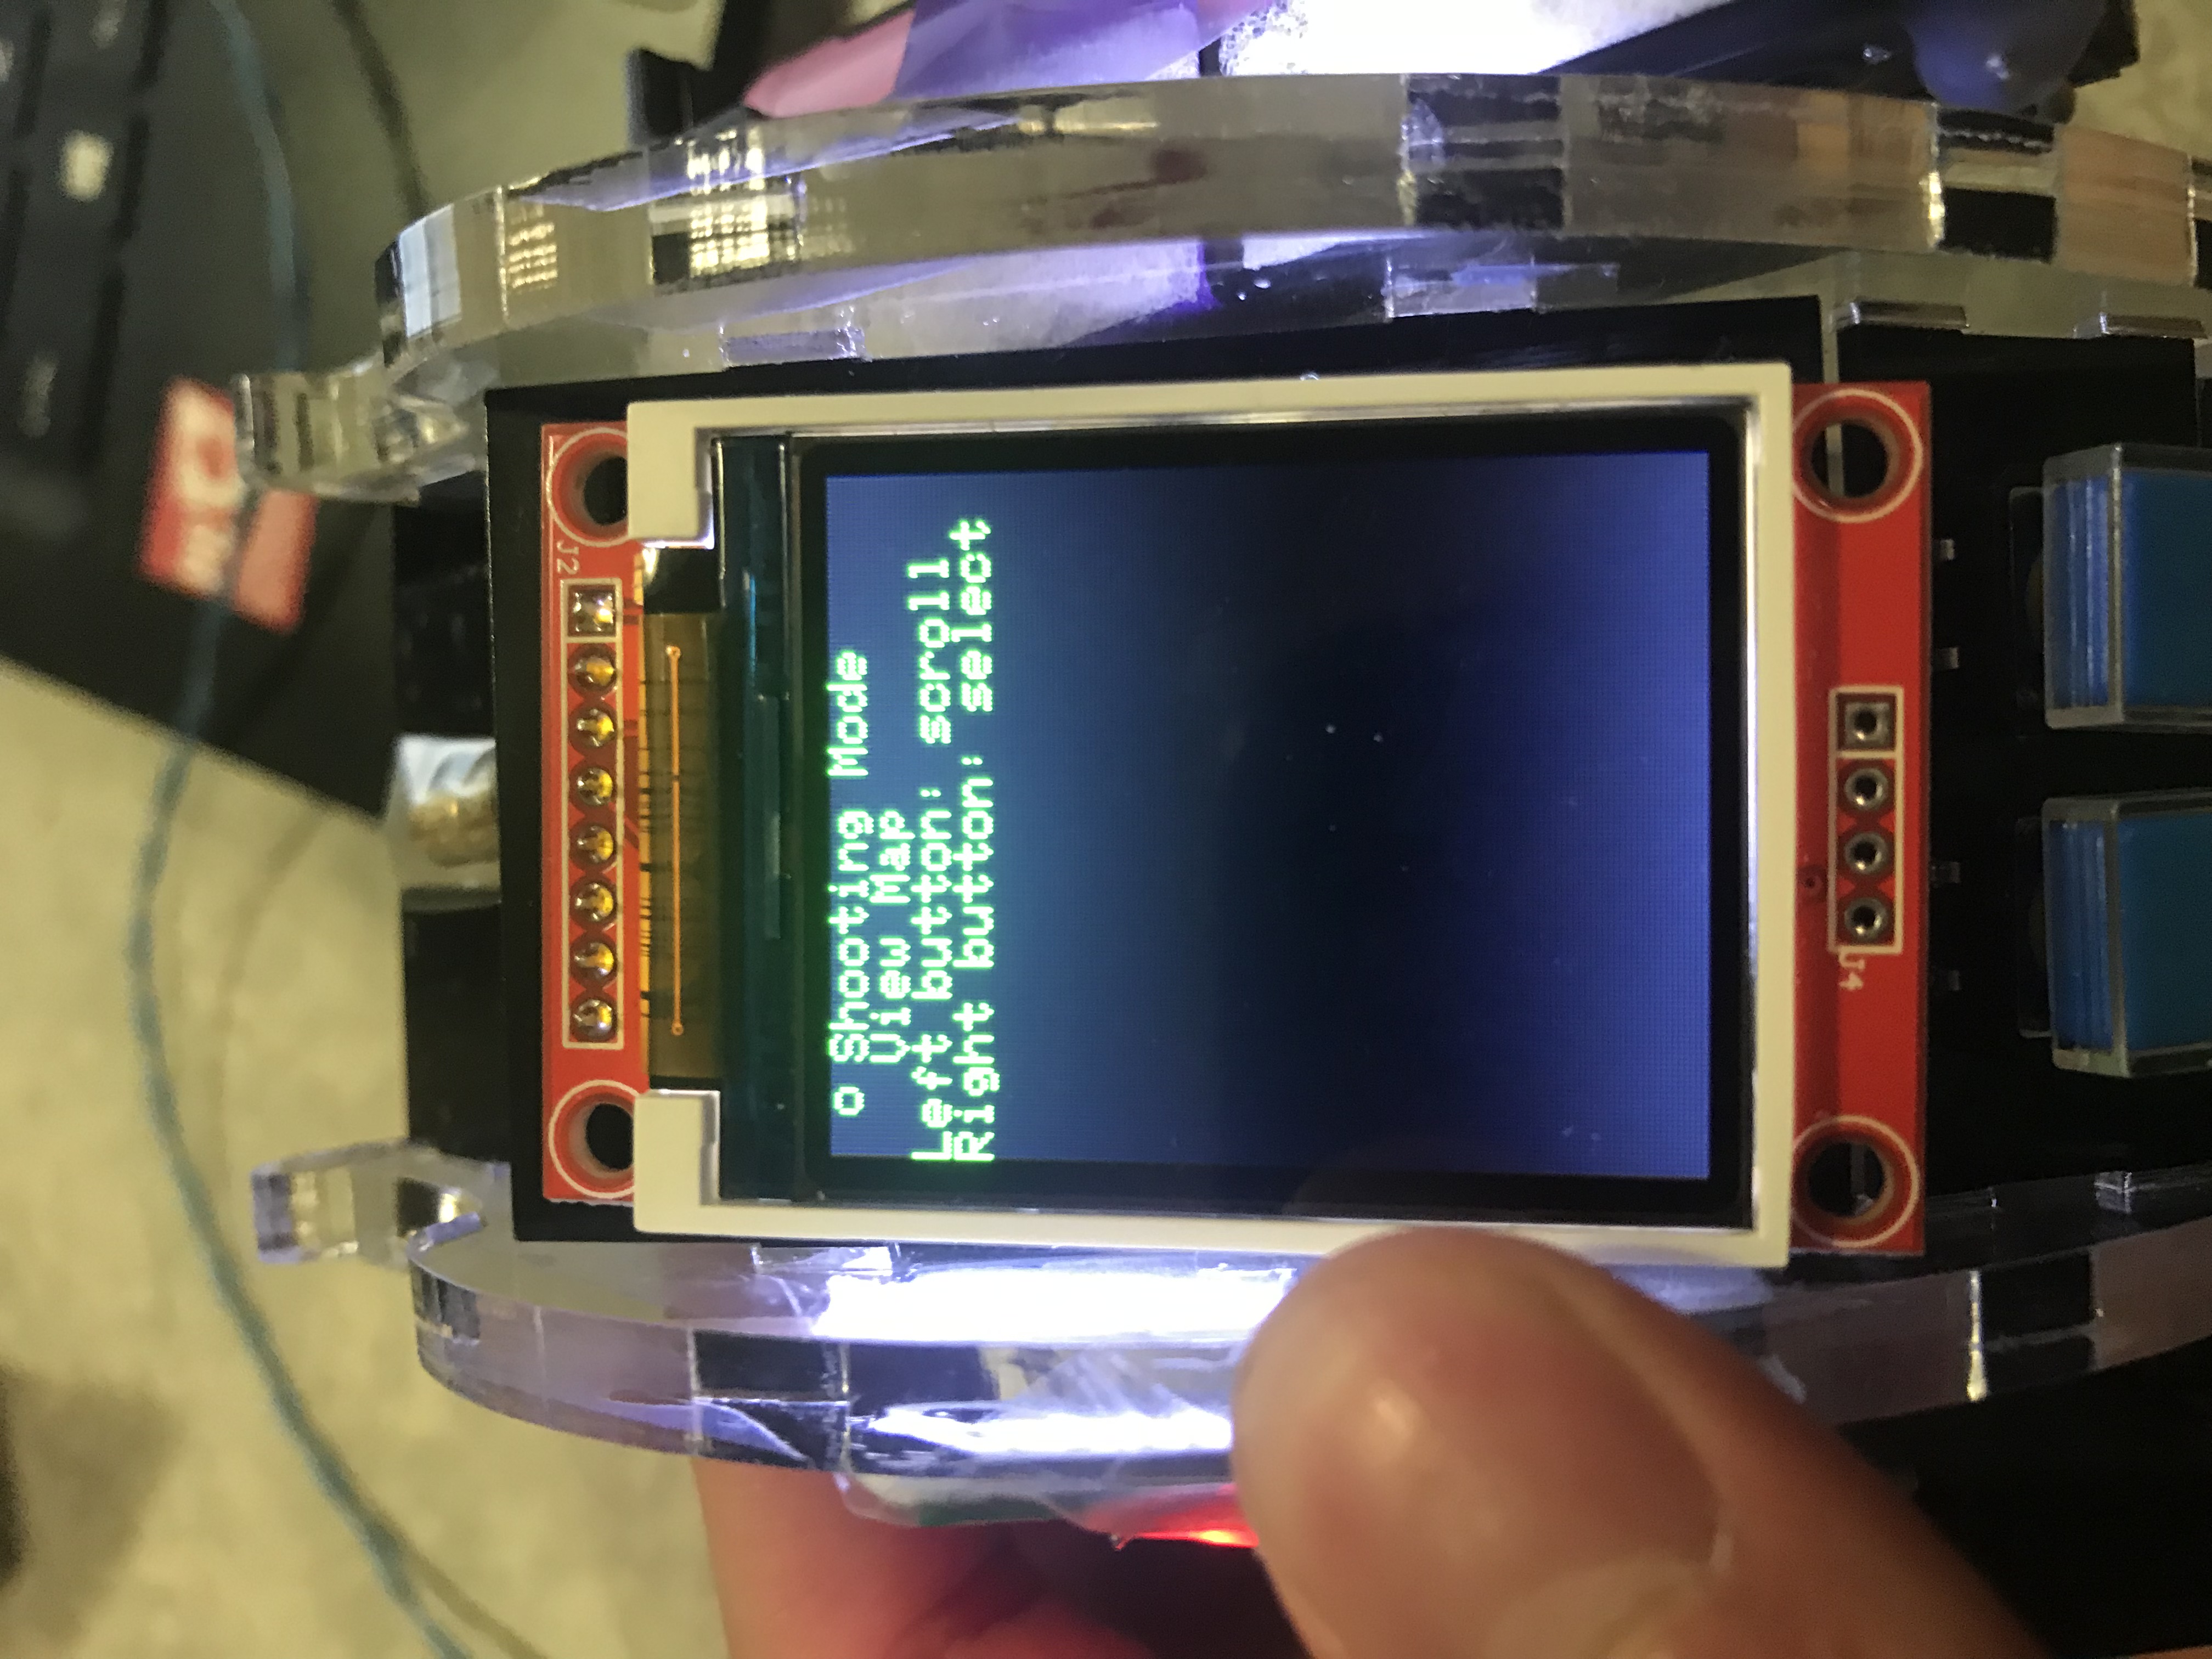
This is the menu state. Players can either choose to enter “shooting mode” or view their location on the map. Once they select an option with a right button press, their selection is stored in a global integer variable by the code, and the player moves to state 1.
### State `1` (Transition):
State 1 is an intermediary button state that serves as a transition to state 2. This state contains a debounce timer and is moved past if the player releases the right button.
### State `2` (Action):
This is the action state. Depending on the value stored in the selection variable, one of two things will happen:
- If “selection” is set to 0, the player will be in shooting mode. The player can click the left button to fire the laser for one second. During this one second period, the mod_sm function is used to modulate the laser (on and off) at a frequency based on the player’s player number (the order in which the players joined the game determines this number). Every time a player shoots, the ESP32 obtains that player’s elimination count from the server. When in shooting mode, the player can see their elimination count and how much ammunition they have remaining. If the player obtains their first kill, they get a shield that makes them immune to the next shot they take. The screen background turns blue to signify that a shield is active.
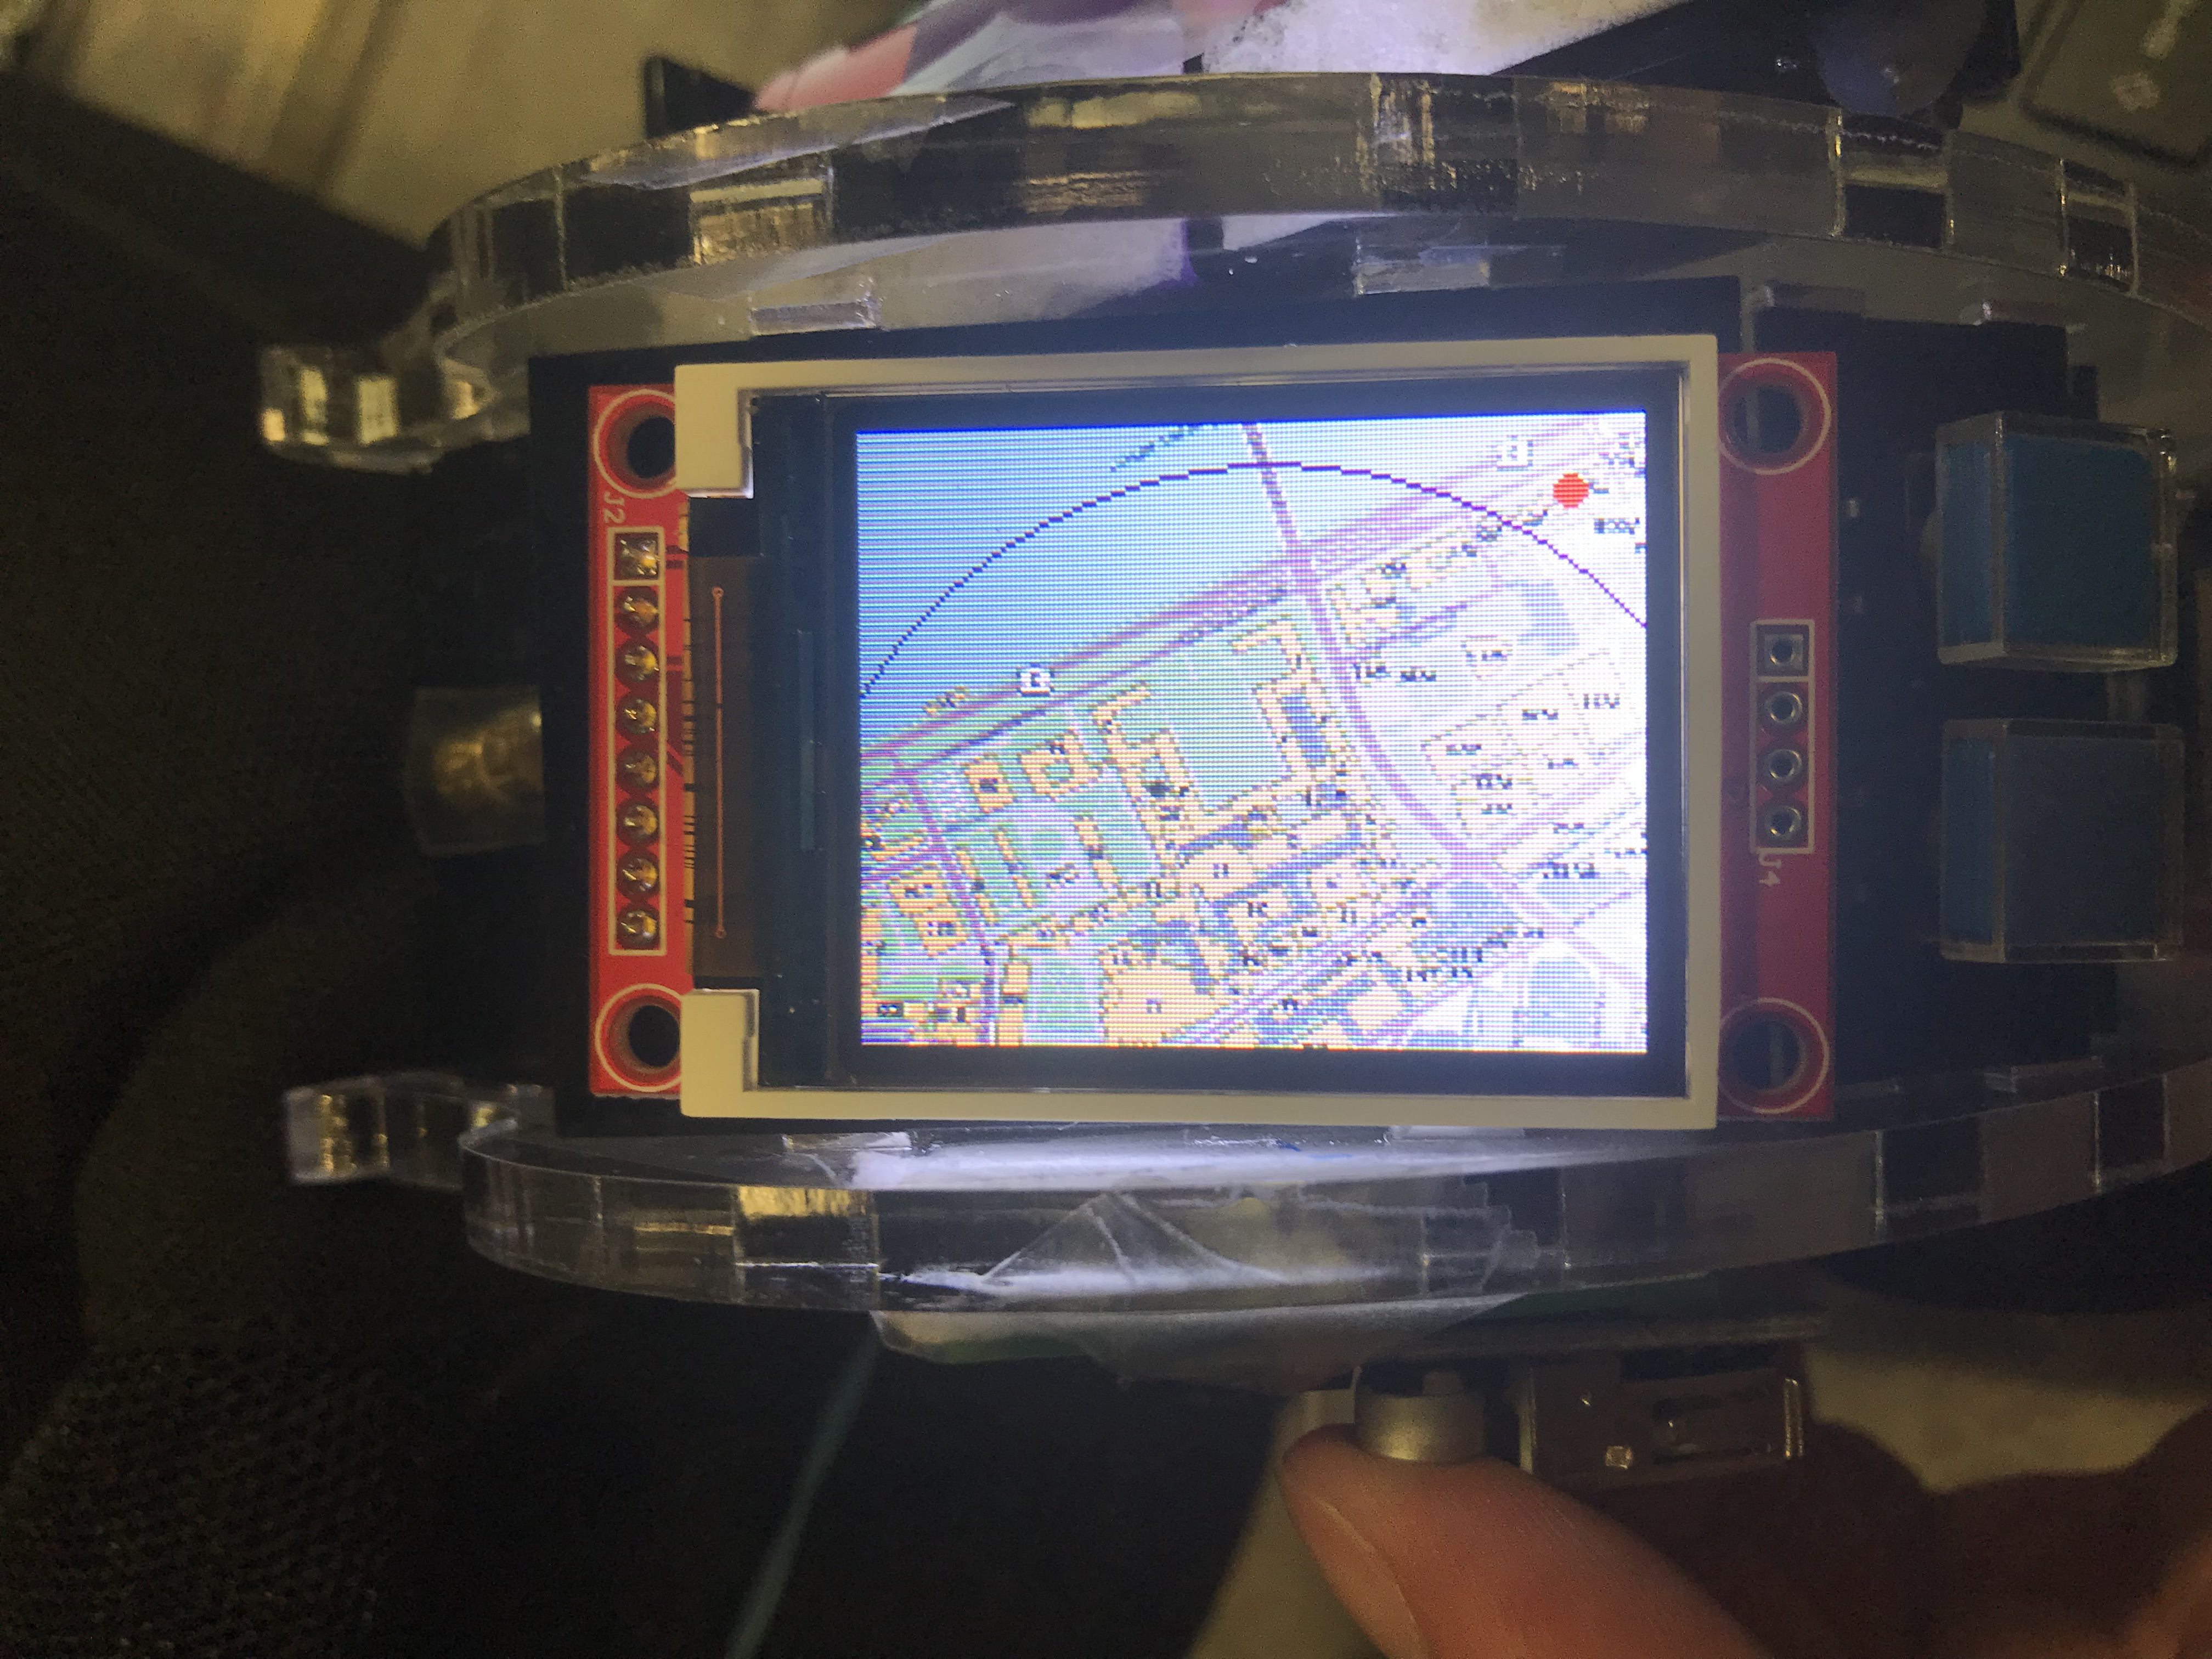
- If selection is set to 1, the get_geolocation function is called in order to obtain the player’s latitude and longitude. This location information is then used in the draw_map function to indicate to the player where they are on campus by representing their position as a red dot on a picture of the MIT map. The draw_map function also shows the “allowed play area” circle of decreasing radius on the map.
If the player clicks the right button at any time while in this state, they return to state 0 (the menu state) regardless of whether they are in shooting mode or are viewing the map.
### State `3` (Lost):

This is the losing screen state. In this state, the player is notified of the fact that they have been eliminated. Their elimination count and their overall rank in the game are also displayed. When the state is initially entered, the ESP32 tells the server the laser modulation (in nanoseconds) with which they were eliminated so that the server can determine who got the elimination. The ESP32 also continually asks the server if a new game has been started (when the winner enters the winning screen, they can start a new game on the server). If a new game has indeed started, indicated by the player count being 0, the player now has the option to click the right button to return to the join state.
### State `4` (Win):
This is the winning screen state. In this state, the player is notified of the fact that they won the game and their elimination count is displayed. They have the ability to click the right button to start a new game. If they do this, a reset command is sent to the server and the player returns to the join state. This not only sets the player count on the server to 0, but tells the server that this player was the winner so that the server can update the long-term leaderboard.
## Geolocation
This is the function that is used to find player location (latitude and longitude) in the game. We utilized Google’s Geolocation API in order to triangulate player location not only with higher accuracy but also when indoors (the GPS unit had trouble detecting location inside buildings). The function first does a WiFi scan to find the mac addresses of nearby routers. It then compiles these mac addresses into a list of up to 10 addresses. Once the scan is done and the list has been completed, the list is sent to the server along with the user’s kerberos. The server then sends the mac addresses to the Google Geolocation API and gets a latitude and longitude back, which is passed on to the ESP32. These values are stored in global latitude and longitude variables. This function is primarily used to tell players where they are on the playing field and to check if players are within the allowed play area circle.
## Play Area
The circle functions as a way to progress the game when it is played on a larger scale by forcing players to periodically progress towards the center as failure to move inward once the player is outside the radius of the circle results in elimination from the game.
### Drawing the Map
The `draw_map` function is used to draw/redraw the map on the tft screen and works by iterating through all the pixel values contained in the header file, `mitmap.h`, and drawing each pixel individually. After drawing the map pixel values on the screen the function draws a circle centered at the randomly assigned, global variable, center point with a radius value that is passed into the function.
### Parsing Server Response
The function `int_extractor` takes in a character array, an output buffer, and a character that serves as a delimiter in order to parse the input character array according to the delimiter provided and input the values that are obtained into the output buffer.
### Updating Circle size
The `update_circle` function takes in an integer radius and a 32 bit integer timer. It first checks if the time difference between the current time and the timer is greater than 90 seconds. If this is true, the function decreases the radius size by 5 pixels or to the minimum radius size if decreases the radius by 5 would result in a radius < the minimum radius, then resets the timer. After this, it checks whether the player is in the circle and sets the inside_circle flag to false if the player is not.
### Checking Player Location
The `check_inside` function takes in a flag corresponding to whether the player is in the circle. If the flag is set to False, the function then checks if the player is in the circle every 10 seconds by repeatedly calling the `get_geolocation` function to find the player location then checking if that location is within the circle, if they are not in the circle, a counter is incremented and the timer is reset so that the location can be checked in another 10 seconds. If they are in the circle the inside flag is set to True. If the `outside_circle_counter` reaches a value of `3`, the player is placed in state `3` (the death state).
## Server Side Code
### `request_handler`
The main function is `request handler` which takes in the request and splits into either a get or post chunk of code. If it’s a get request, it calls the function `get_leaderboard` which displays the leaderboard in a browser. If it’s a post request, the code uses `action` which calls a function based on the post request. The actions include joining the game, check and setting game status, checking the players in game, getting tagged, resetting the game, getting the map, and checking the number of eliminations of a specific player.
### Debugging Functions
`debug_reset_game`
The function is similar to `reset_game` except it doesn’t update the leaderboard as it is solely used for debugging purposes. It connects to the lasertag database and drops all four tables relative to gameplay which include `current_players`, `shots`, `game_status`, and `map_data`. It also sets `game_status` to lobby.
### Game Status Functions
These functions all process data in the database and return it to the ESP in a readable format to be parsed
`get_status`
The function `get_status` connects to the `lasertag` database and selects status from the `game_status` table along with the number of players alive from `current_players` table. It returns both. The function is used to get the status of the game safely and the number of players.
`get_players`
The function `get_players` connects to the `lasertag` database and selects all players from the `current_players` table. It iterates through all the players and counts the number of players alive. It returns the total number of alive players. The function is used to check the number of players still alive within the game.
`get_rank`
The function `get_rank` uses the parameter `user` who recently got eliminated. It connects to the `lasertag` database and gets the number of current players alive in the `current_player` table. It returns a string of their rank. The function is called at the end of the `update_current_players` to return the final rank of the tagged user.
`get_kills`
The function `get_kills` uses the parameter `user` and connects to the lasertag database. It returns the number of kills of the `user` within the `current_players` table. The function is used after every laser shot to determine if the player got the kill and updates their elimination count accordingly.
### Game Setup/Operation Functions
These update game parameters, and may also return data to the ESP
`reset_game`
The function `reset_game` connects to the lasertag database and utilizes the parameter `user`. It drops all four tables relative to gameplay which include `current_players`, `shots`, `game_status`, and `map_data`. This function is used when the winner resets the game, so it adds the winner and their eliminations to the leaderboard. Lastly, the function updates `game_status` to lobby since the game is officially over.
`add_player`
The function connects to the lasertag database and utilizes the parameter `player`. The function checks if the player is already in the lobby. If the player isn’t, it gives them a unique `id` and `pulse` based on the number of players already in the lobby. The `pulse` is 1000 times the id number. It then inserts the new player into `current_players`. If the player is already in the lobby, it returns a string that the user is already in the lobby. The role of the function is to join a game and get the unique `pulse` needed to play.
`update_current_players`
The function `update_current_players` connects to the lasertag database and utilizes the parameters `user`, `tagged`, and `pulse`. The parameter `user` is the player who got tagged, `tagged` signifies that the user has died, and `pulse` is the pulse reading from the sensor. The function selects the player from `current_players` who has the same pulse reading and adds 1 kill to them. It also updates the `user` who was tagged to be dead and returns the rank of the user who died by calling the `get_rank` function. The function is core to the game mechanics as it awards eliminations to the correct user who shot and updates the alive players. The rank returned is used at the death screen.
`set_status`
The function takes in a string parameter `new_status` and connects to the `lastertag` database. It drops the `game_status` table and creates a new `game_status` table with the newly updated status. The function is used to keep track on whether the game is currently being played or if the game is in lobby mode.
`initialize_circle`
At the beginning of the game, this function connects to the `lasertag` database and inserts a random `x_coord`, random `y_coord`, radius, and time into the `map_data` table. It returns the center of the circle coordinates and the radius. The function is used to create a standardized circle for the map for all users playing.
### Leaderboard
We wanted to have a human-readable way for users to see the long-term records of who is the best at MIT Laser Assassin, so we created a leaderboard. This leaderboard ranks the users with the most kills after a win.
This uses the `leaderboard` table which is updated every time the game is won. For every user in this table, it adds up every entry to find their total kills. It then sorts these by their kills, and inserts them as list items into an HTML template we created, which the function returns as a string. This allows players to easily see how they're doing compared to others from their own browser.
## Modulated Laser Firing
In order to transmit the signals to tell who shot who, we needed a way to fire the laser so that it blinks at a certain rate for a specified amount of time. Thus, the `mod_sm` function:
- *Input:* `laser_flag`: an integer, `1` to initiate laser firing. The current button state in our code.
- *Output:* None, but `digitalWrite`s to the global `LASER_PIN` when needed to modulate the laser.
****************************************************************************************
* +----------------+ +-----------+ digitalWrite HIGH +----------+ *
* | | laser_flag == 1 | +----------+---------->+ | *
* | State 0 +------------------>+ State 1 | millis() - mod_timer | State 2 | *
* | Wait for Input | | Laser OFF | exceeds mod_interval | Laser ON | *
* | | | +<---------------------+ | *
* +-----+----------+ +-----------+ digitalWrite LOW +----+-----+ *
* ^ | *
* | +-----------+ | *
* | | | | *
* | | State 3 | fired for long enough | *
* +------------------------------+ End Shot +<--------------------------+ *
* | POSTs | *
* | | *
* +-----------+ *
****************************************************************************************
Starts in a waiting state, state `0`, which is stored in the global `mod_state` variable. When `laser_flag` is `1`, changes state to begin firing. It then moves to alternate between two firing states, `1` (laser on) and `2` (laser off). Each state waits for `mod_timer` to show that the time elapsed is greater than `mod_interval`, which is the length of time (in milliseconds) that the laser should be in each state (on/off).
When enough time has passed, it changes the state to the other firing state and `digitalWrite`s to set the laser to the other state.
We also want the shot to only last for a certain period of time. To do this, each shooting state checks if `fire_timer` (holds the time that the shot started) shows that the shot has been ongoing for `shot_length`. If it has, the state moves to state `3`, which turns the laser off and POSTs to the server, telling it that the user has shot. This allows the server to keep track of ammo. It then moves back into the waiting state.
## Modulation Pulse Detection
### Brightness Conversion
Our most basic need when detecting whether a user was shot was deciding if the laser was hitting the user's sensor. To do this, we have the function `convert_brightness`:
```
int convert_brightness(int input) {
if (input > PR_THRESHOLD) {
return 0;
} else {
return 1;
}
}
```
- *Input:* `input`: an integer, the reading of the sensor each loop.
- *Output:* an integer, 0 if the laser is not on the sensor and 1 if it is.
This function simply compares the current reading to the global variable `PR_THRESHOLD`, which stores the value below which a reading is classified as a laser hit.
### Pulse Timing
We also needed to detect the pulses the lasers were sending. To do this, we have the function `pulse_detect`:
```
int pulse_detect(int input) {
int current_val = convert_brightness(input);
if (current_val != last_val) {
last_val = current_val;
int last_pulse = micros() - pulse_timer;
pulse_timer = micros();
return last_pulse;
} else {
return 0;
}
}
```
- *Input:* `input`: an integer, the reading of the sensor each loop.
- *Output:* an integer, 0 unless the end of a pulse was just detected and the length of the just-detected pulse otherwise (in microseconds).
This function looks for a change in the yes/no converted value of the input, and times the distance between these changes. It keeps track of the previous value
and the current value in two global variables `last_val` and `current_val`. It updates `current_val` every loop, and if these are different, it updates `last_val` and saves the current time for use next time.
The functino then returns the difference between the current time and the time of the start of the pulse. If no change was detected, the function returns 0.
### Pulse Validation
Finally, we wanted to check whether the pulse recieved matches a valid pulse from another player and convert it back into milliseconds. To do this, we have another filtering function `check_pulse`:
```
int check_pulse(int pulse_period) {
// check if the pulse is within range of a microsecond
int output = 0;
int pulse_micros = 0;
if (pulse_period % 1000 <= pulse_buffer) {
pulse_micros = pulse_period / 1000;
} else if (pulse_period % 1000 >= 1000 - pulse_buffer) {
pulse_micros = pulse_period / 1000 + 1;
}
for (int i = 0; i < num_players; i++) {
if (player_pulses[i] == pulse_micros) {
output = pulse_micros;
}
}
return output;
}
```
- *Input:* `input`: an integer, a pulse length reading in microseconds
- *Output:* an integer, 0 unless a pulse was valid, and the length of the pulse in milliseconds otherwise.
This function does two things. First, it checks that a pulse was approximately a multiple of a millisecond long: since our pulses are sent to be precisely a millisecond long, anything that isn't close to a millisecond can be discarded as not being from a laser.
If a pulse is classified as within range of a millisecond, we then convert it to the nearest millisecond. However, we still want to make sure this pulse matches one that a laser sent. To do this, we have a global array of integers `player_pulses` that holds the possible pulses,
in our case integers 1-5 due to the way the server assigns pulse times. If the detected pulse does not match one of these, we can also discard it. If we determined that a pulse was invalid, we return a 0, otherwise, we return the integer value of the pulse.
# Power Management
Our game largely depended on regular contact with the server, and was also near-constantly interacted with: it was less of a long-term application. However, we still wanted our system to last as long as possible, to reduce the need for regular charging. To do this, we considered several factors that consume power.
- The Screen: Consumes around 50mA whenever it's on according to our testing. One way to reduce power usage would be to turn the screen off after a period of inactivity.
- WiFi module: Consumes the most power, but we didn't think it would be practical to switch this on and off with how much we do with it. This uses extra power when actively sending and recieving data, so we tried to limit POST and GET requests whenever we could, only keeping those that were necessary.
## Power Consumption Breakdown
Because we keep a constant connection to WiFi for the whole duration of the game, most states, fit into two categories: either the ESP is actively sending/recieving data, and thus uses a total of `180mA`, or the WiFi module is idling, which uses a total of `110mA`.
**Join State**: `110mA`
This state simply waits for the user to push the button to join the game, and as such uses the same power as other 'idling' states do.
**Lobby State**, **Lost State**: `110mA` or `180mA`, Average of `111mA`
Because this state needs to constantly update how many players are in the game, we need to repeatedly send requests to the server. However, this is not very time sensitive. To improve the average power consumption from our previous design which sent requests as fast as it could, our current version sends requests only every 2 seconds. Because the WiFi module only sends for ~10ms per request, this decreased our power consumption in this state from `180mA` to ~`111mA`.
**Main Menu**, **Map**, **Shooting Screen**: `110mA` or `180mA`, Average of `110mA`:
In these states, the only checking we need to do with the server is checking location, which is unlikely to change quickly. To conserve power, we only get the user's location every 90 seconds while they're in the active play area, and if they end up outside, we update every 10 seconds to be able to tell if they reenter the play area in time.
Getting the location also requires scanning the nearby wifi networks. In this state, the ESP used a total of `160mA`. This also takes longer than sending a request, but because it is done so infrequently it won't affect our overall consumption.
## Battery Life
Assuming a battery size of `480mAh`, a power conversion efficiency of 80%, and an average current consumption of `115mA`, to ensure a conservative estimate, we calculated the battery life.
$ \frac{480 * 0.80}{115} \approx 3.3 $ hours
This calculation shows that our system is capable of lasting over three hours. A single game is limited to 20 minutes, so this seems like plenty of battery life to play several games on a single charge. While we could optimize further by dimming the screen and possibly turning off the WiFi module completely sometimes, this battery life seems very workable for a prototype.
top